Writing the Main Configuration File
1. Preparation
Please prepare the robot's URDF file.
Next, using OpenLoong as an example, we will introduce how to construct the configuration file.
Confirm URDF Availability
In the OpenLoong path, use the following Python 3 script to test:
import pybullet as p
import time
p.connect(p.GUI)
p.loadURDF("azureloong_description/urdf/AzureLoong_sr.urdf")
while 1:
    time.sleep(0.1)
Correct operation should display the robot correctly in pybullet.
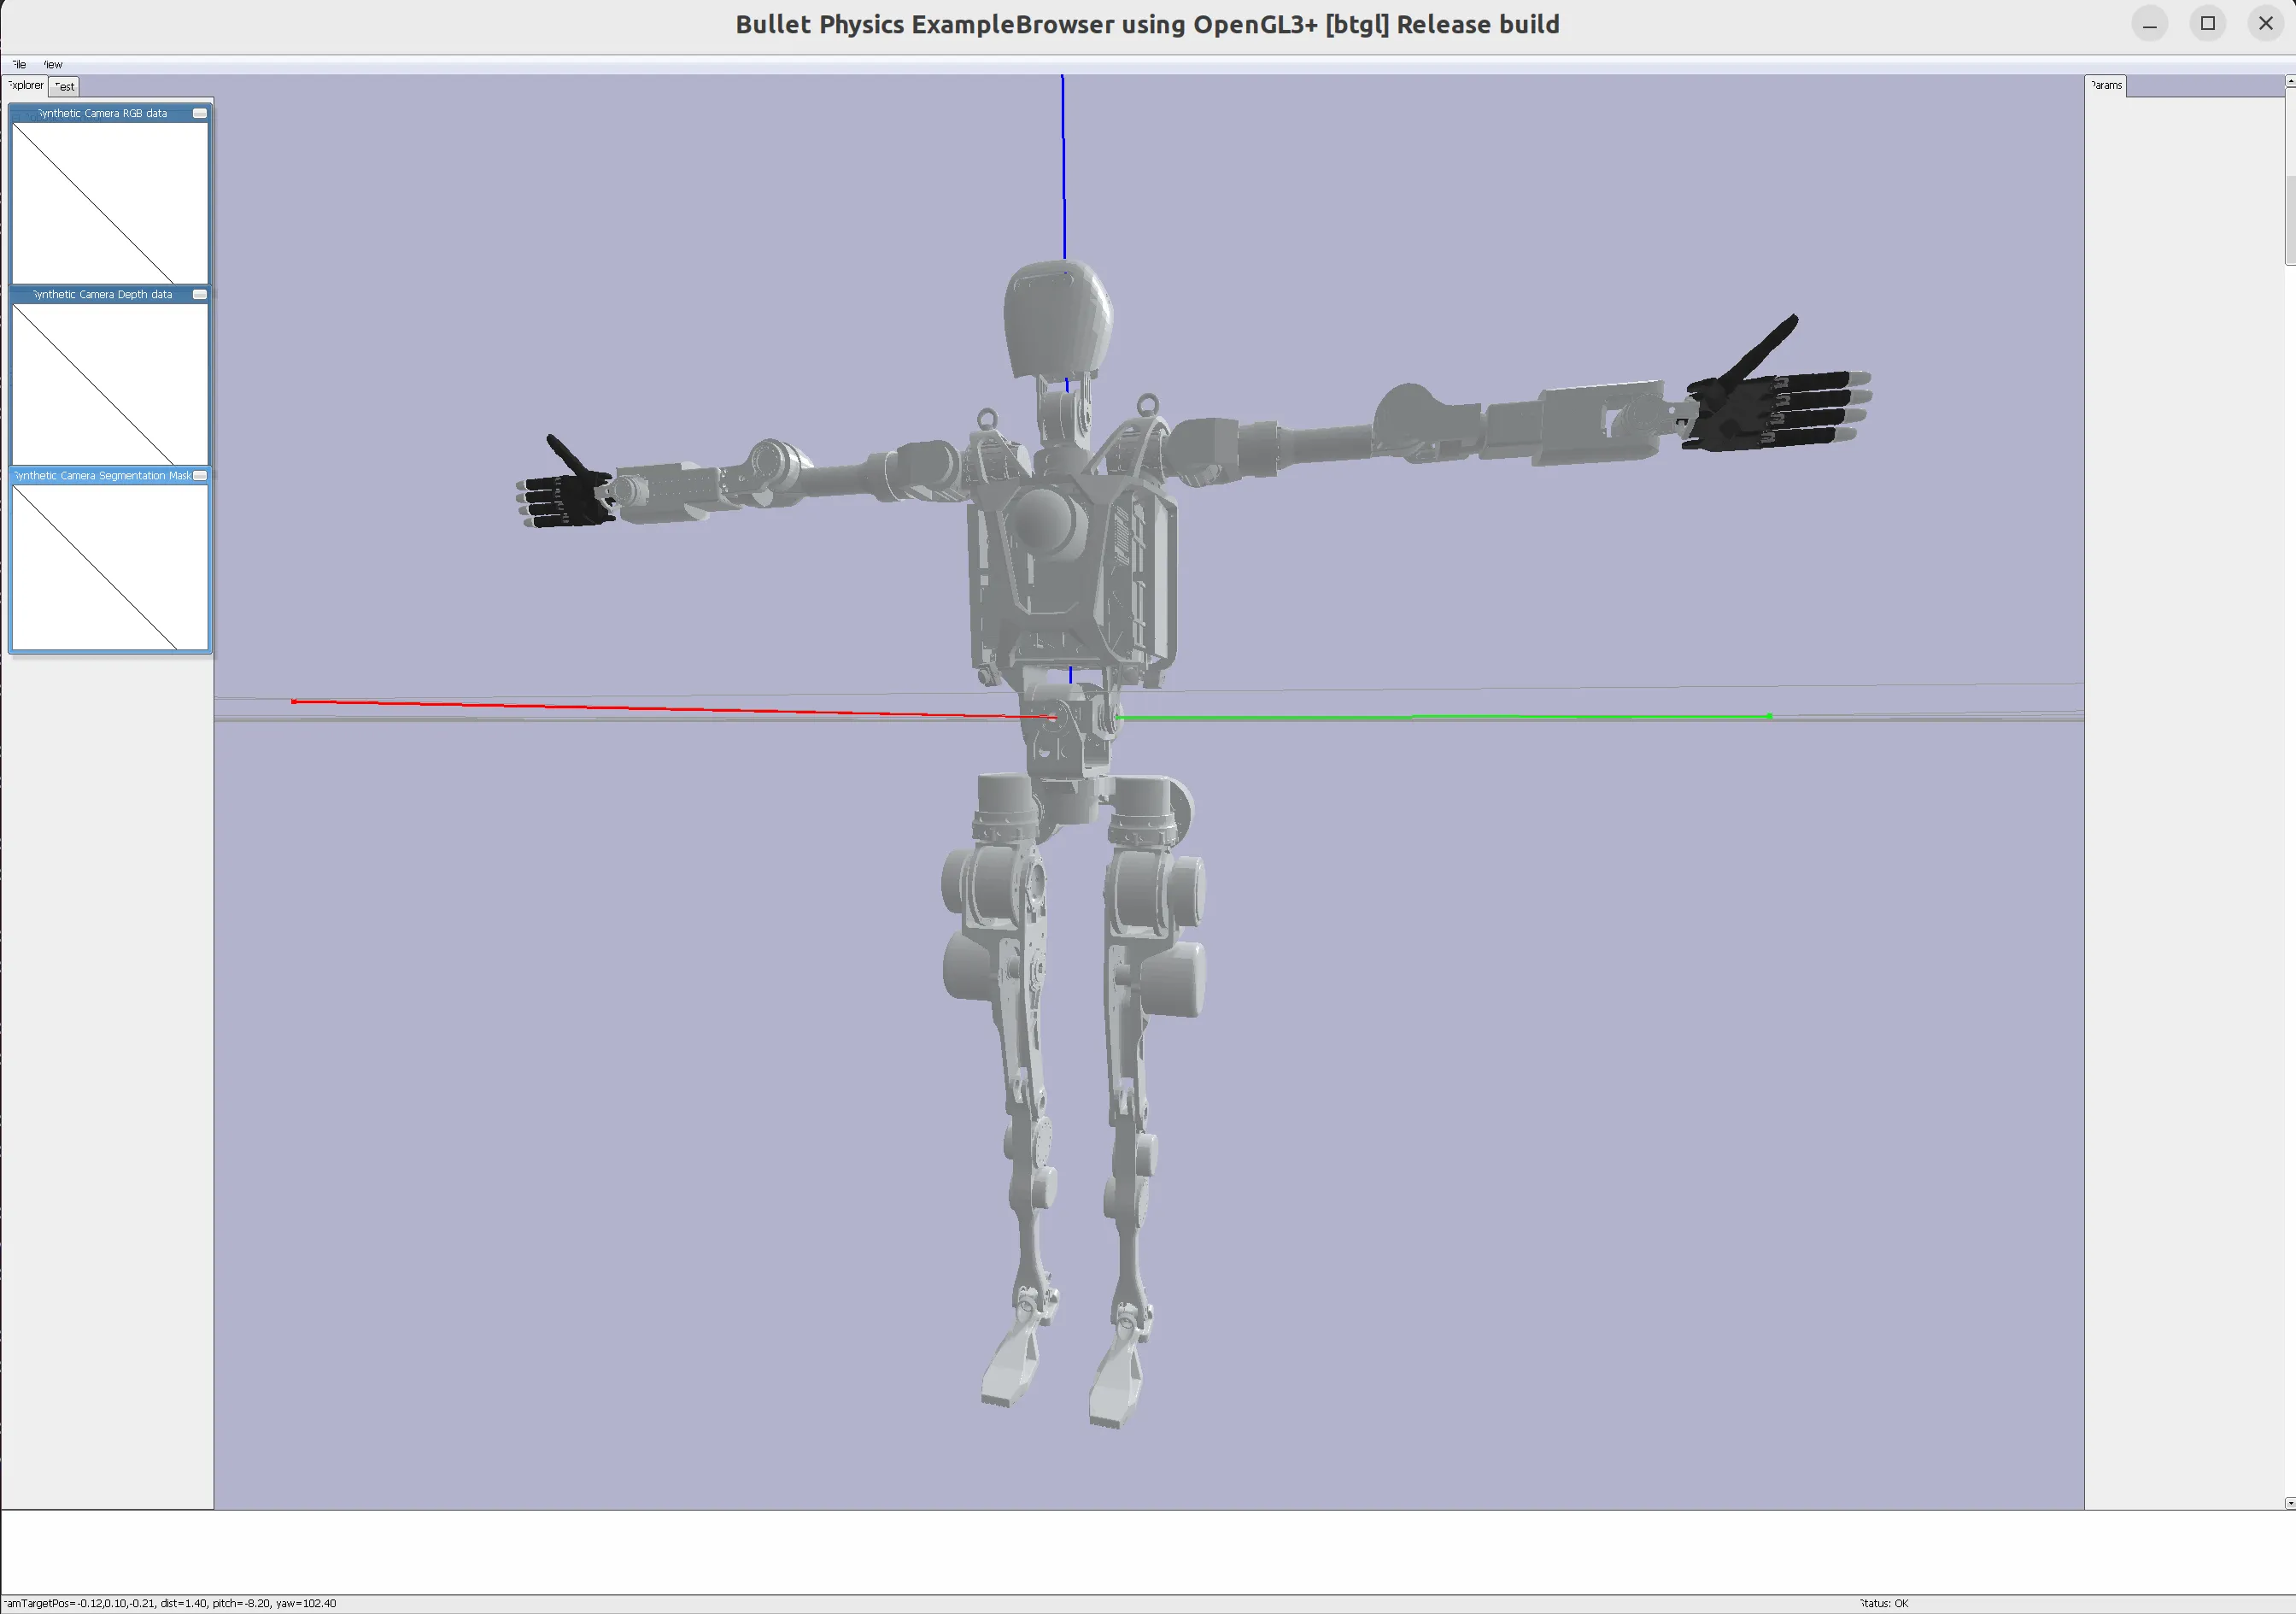
2. Determine the Robot's Home Pose
Adjust the Robot's Home Pose
In the OpenLoong path, use the following Python 3 script to test:
import pybullet as p
import time

p.connect(p.GUI)
robot_id = p.loadURDF("azureloong_description/urdf/AzureLoong_sr.urdf")
joint_index_debug_param_dt = {}
for i in range(0, p.getNumJoints(robot_id)):
    joint_info = p.getJointInfo(robot_id, i)
    print(joint_info)
    if joint_info[2] != p.JOINT_FIXED:
        joint_index_debug_param_dt[i] = p.addUserDebugParameter(
            paramName=f"   {i}    {joint_info[1].decode('utf-8')}",
            rangeMin=joint_info[8],
            rangeMax=joint_info[9],
            startValue=p.getJointState(robot_id, i)[0],
        )
while 1:
    for joint_index, param_id in joint_index_debug_param_dt.items():
        p.resetJointState(robot_id, joint_index, p.readUserDebugParameter(param_id))
    time.sleep(0.1)
After running the program, you should see the following visualization interface
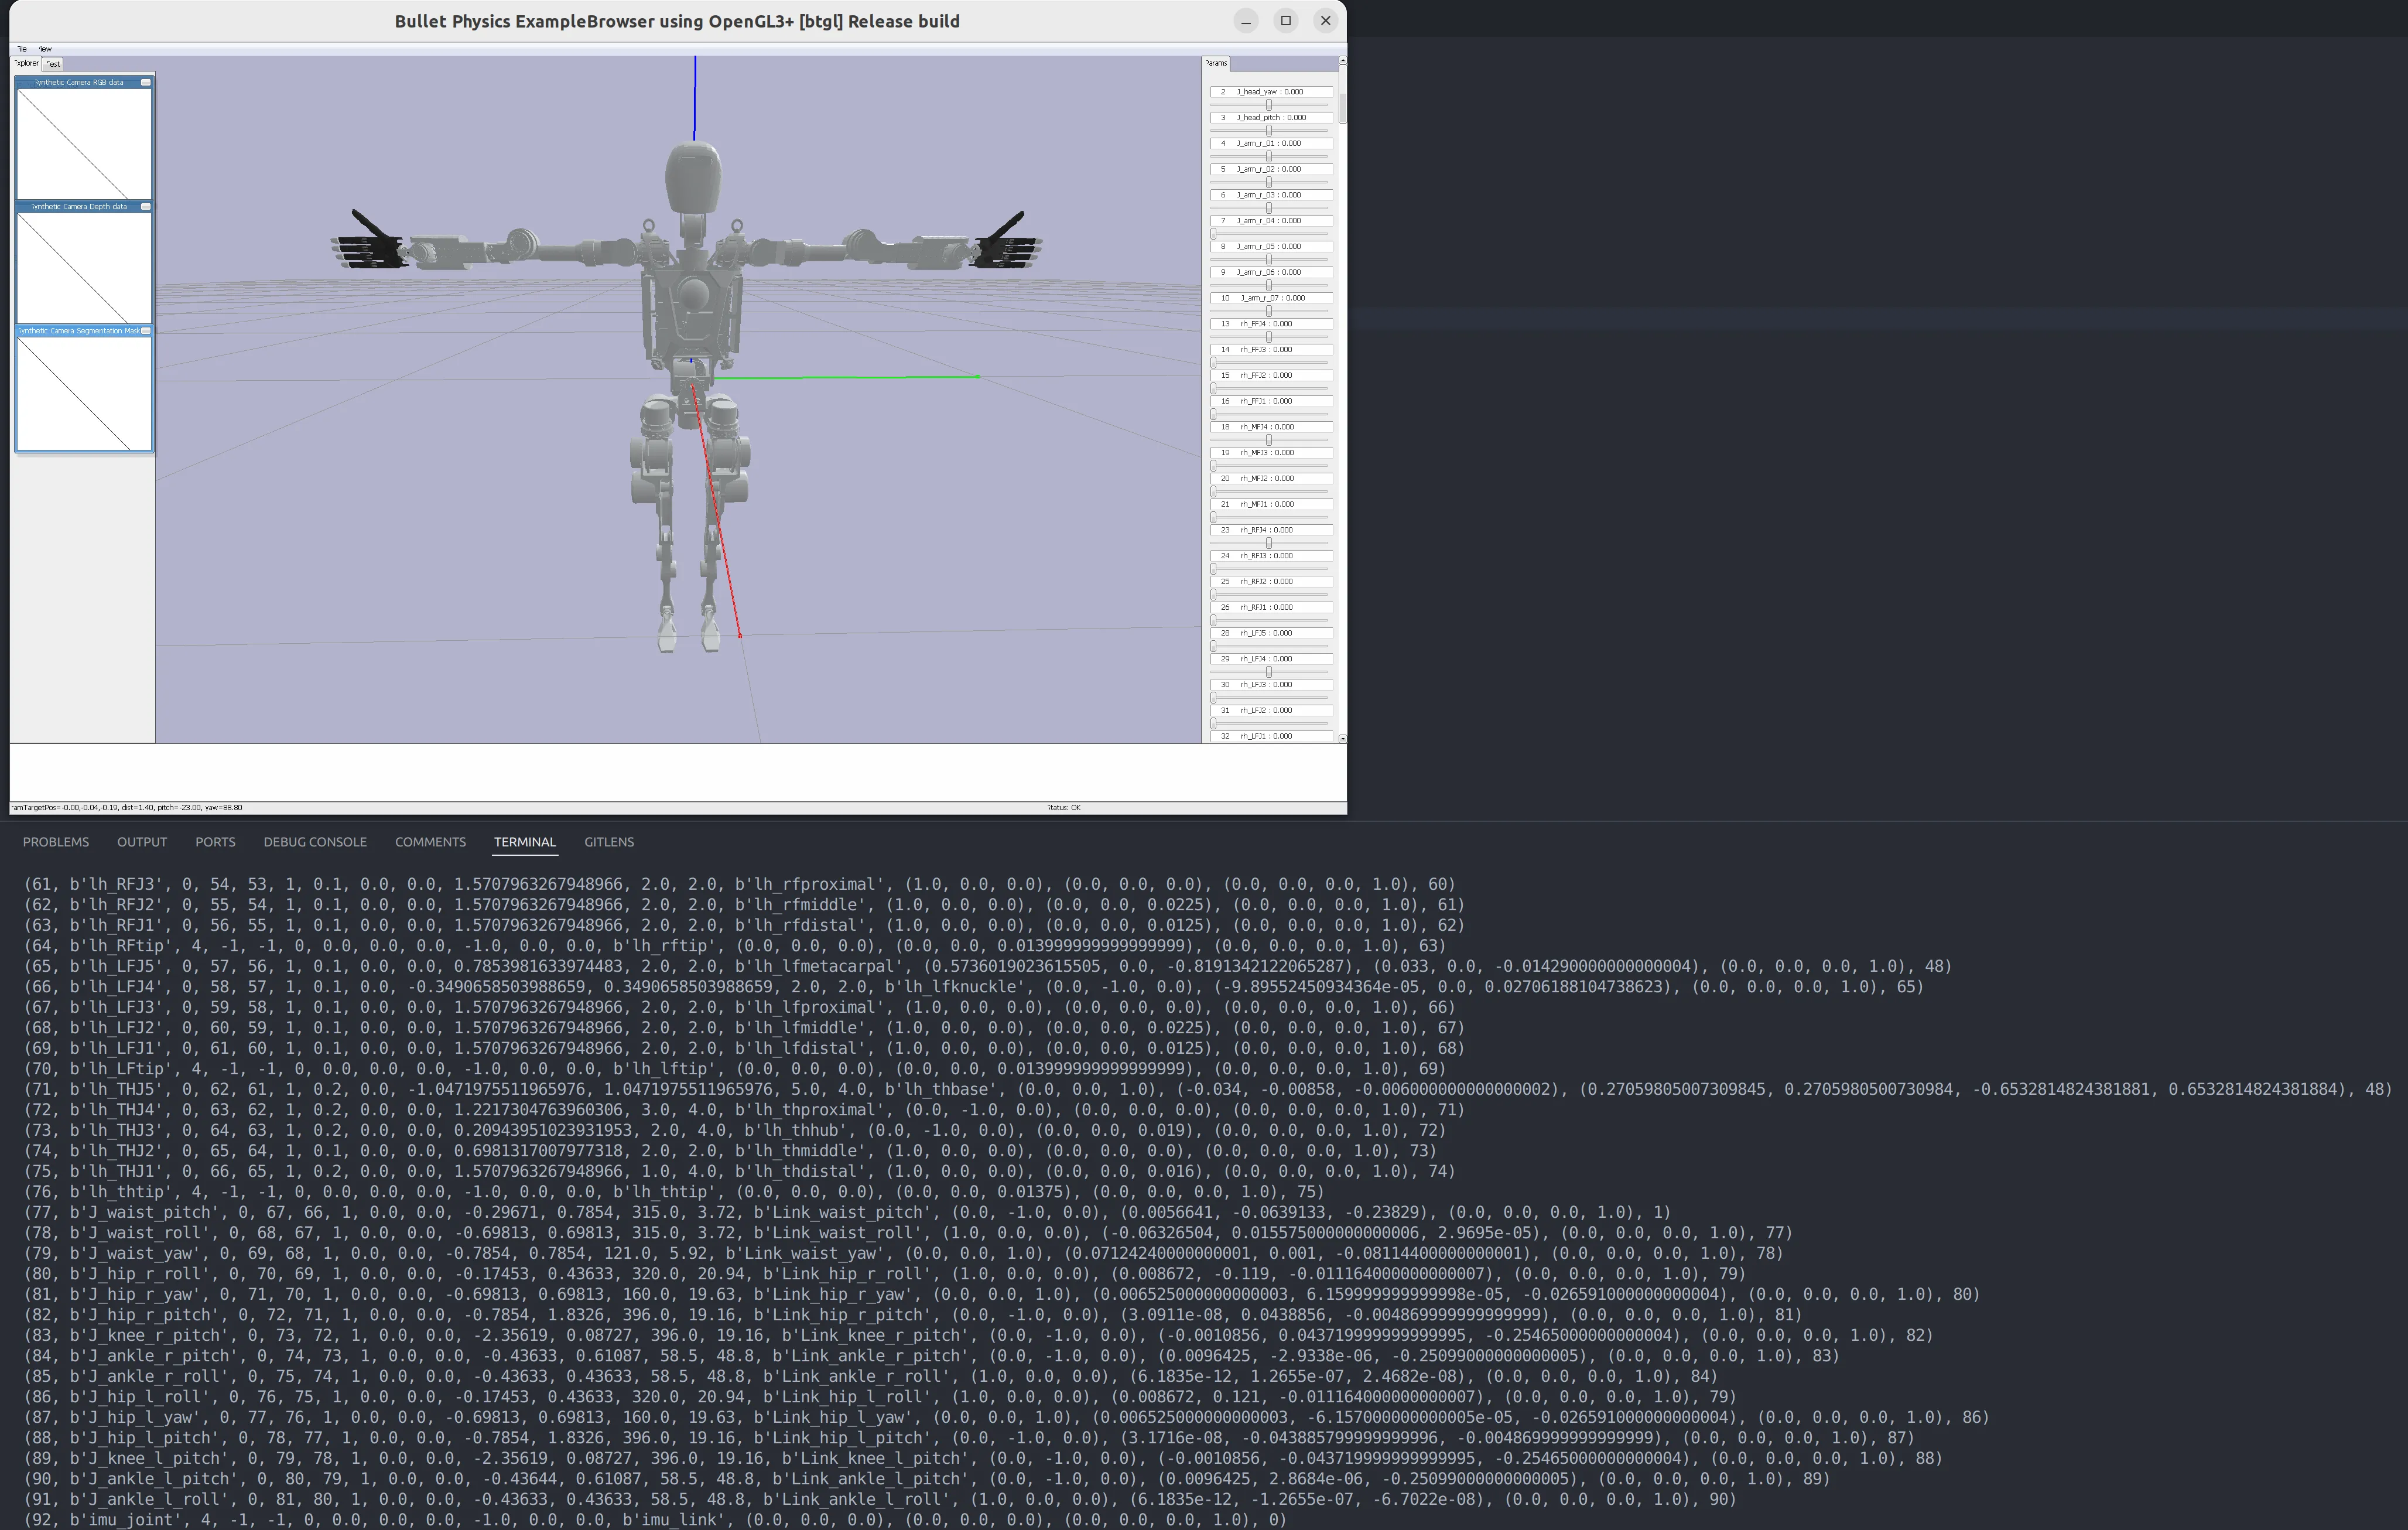
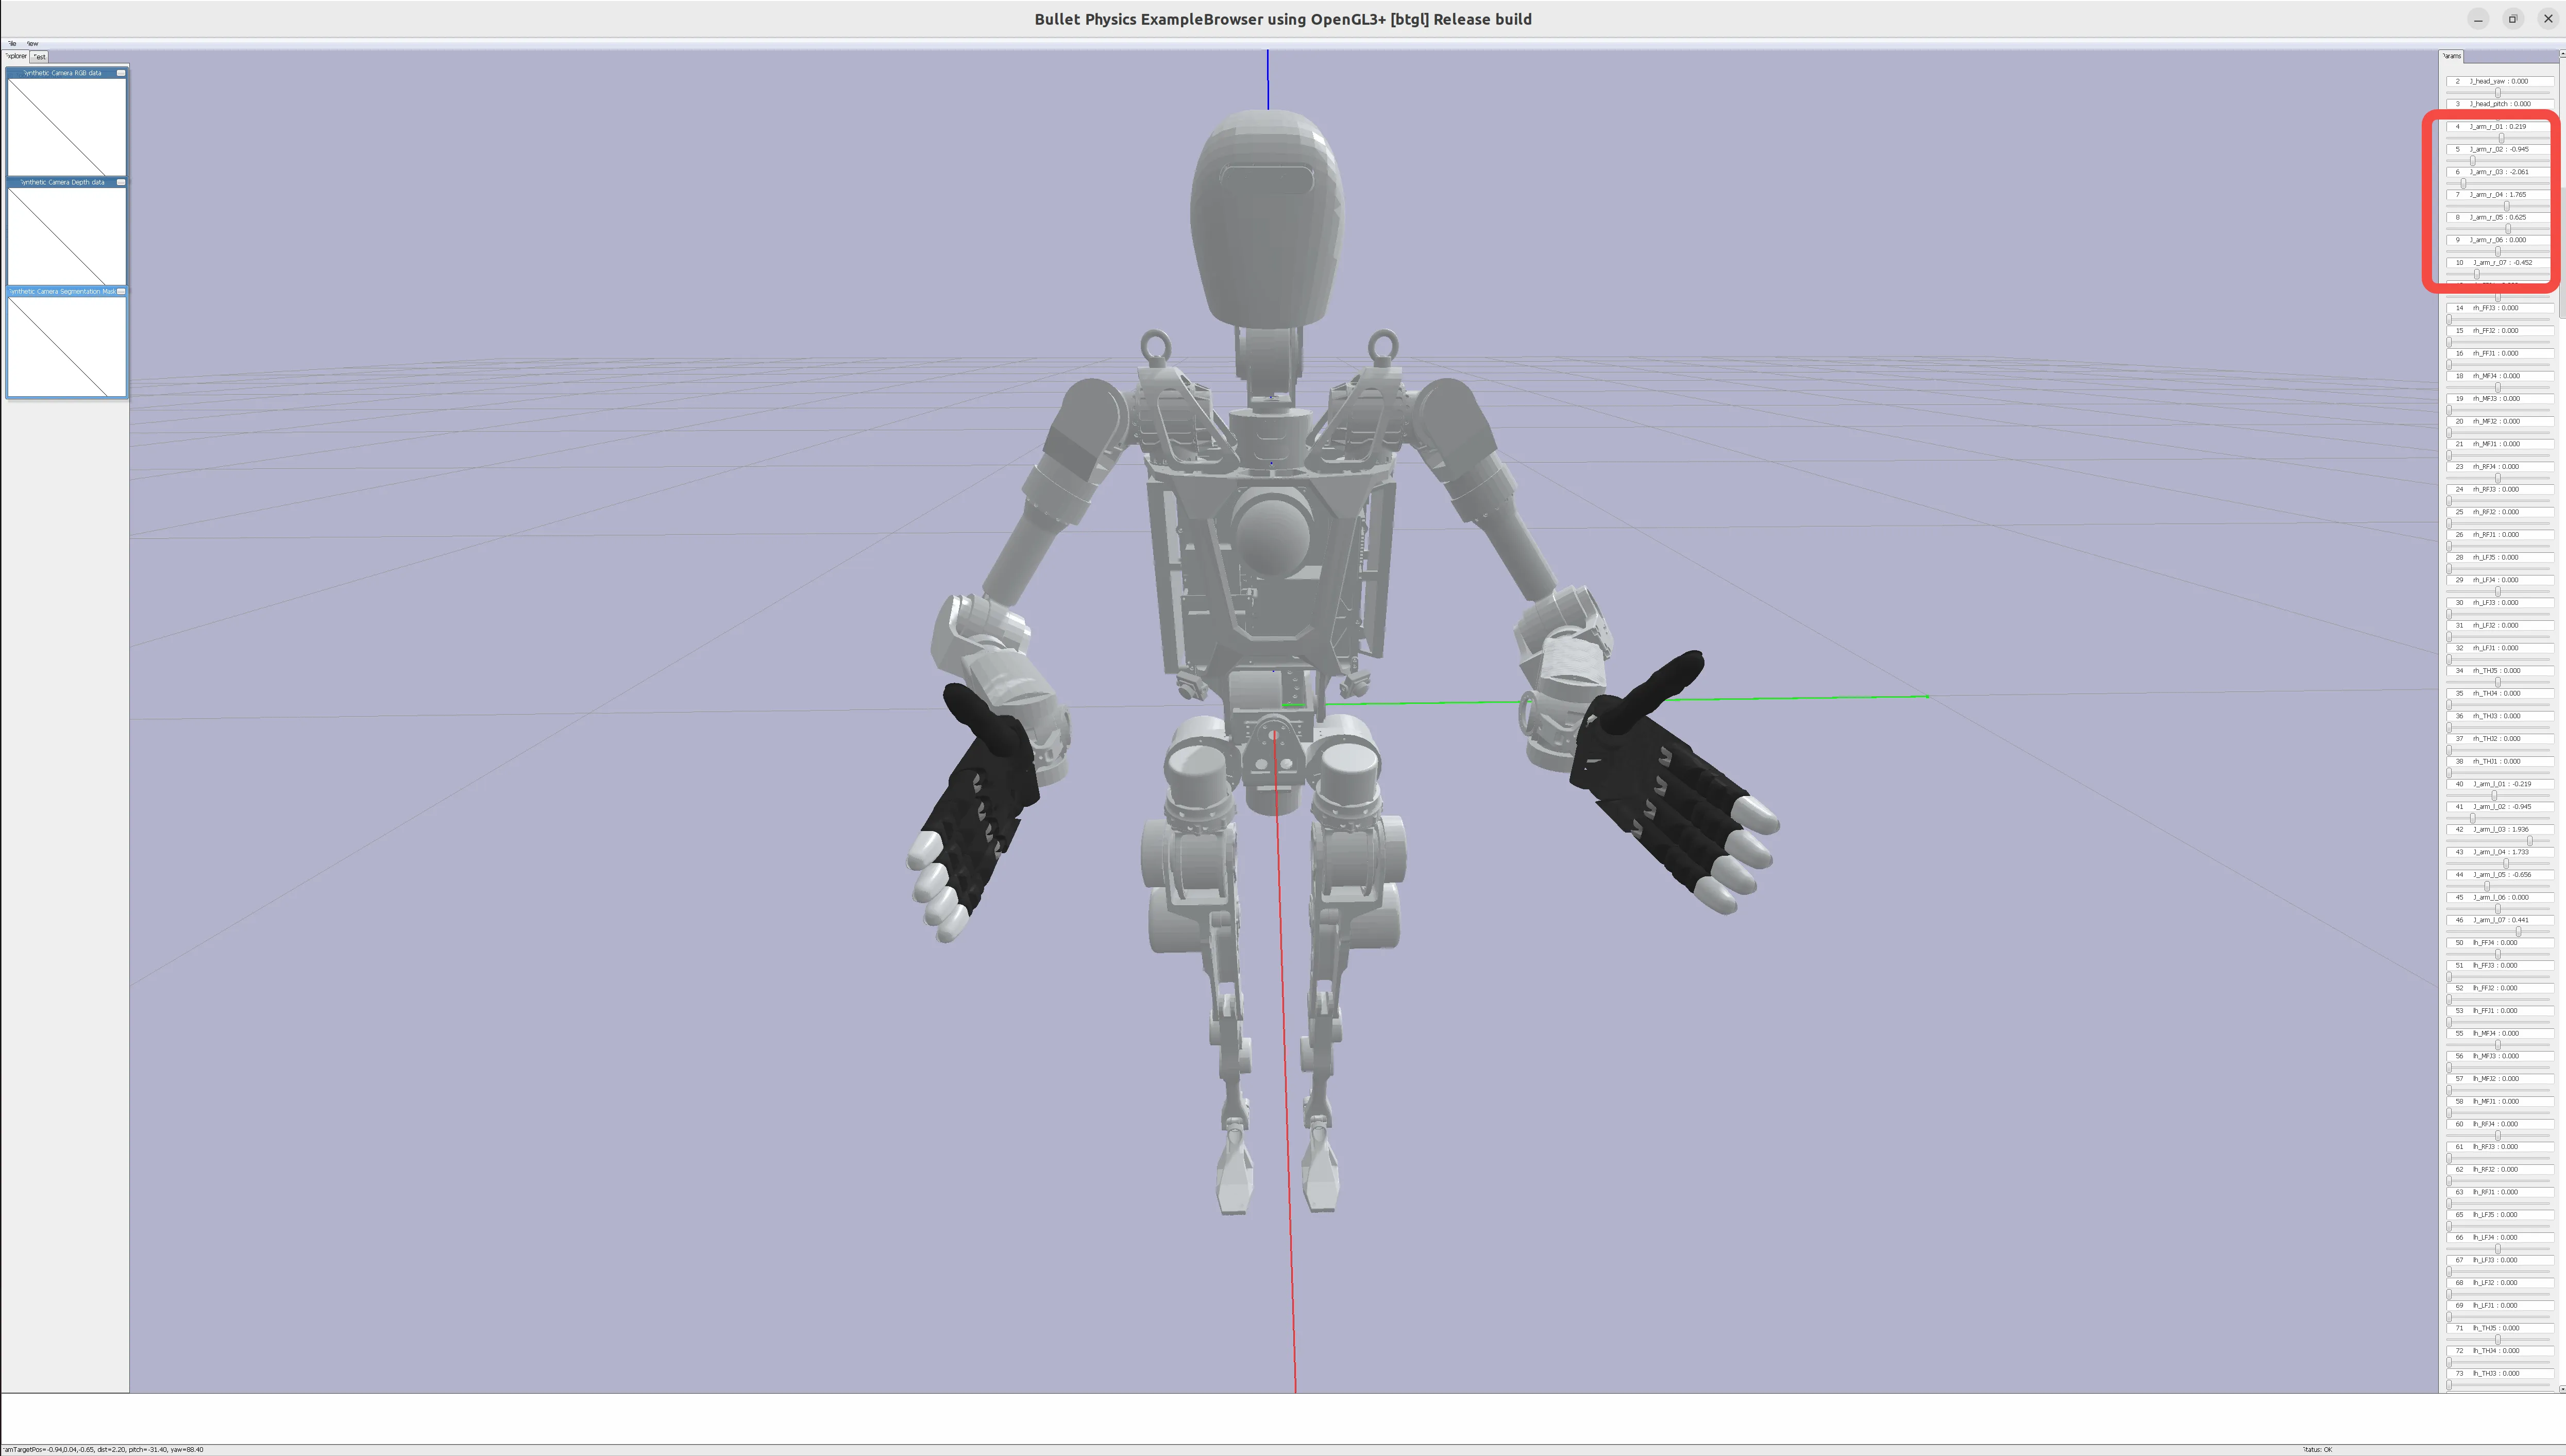
By adjusting the sliders on the right, adjust the joint angles of the robot arm to the desired home pose. For example:
Adjust the right arm to approximately the following position: [0.20, -0.97, -2.00, 1.70, 0.63, 0.00, -0.43]
Adjust the left arm to approximately the following position:
[-0.20, -0.97, 2.00, 1.70, -0.63, 0.00, 0.43]
3. Add EE Definition
After adjusting the robot arm to the home pose, you need to add EE link and joint in the URDF for end-effector pose mapping.
When running the Adjust the Robot's Home Pose script, the terminal will print out the robot's joint information. Find the end link of the robot arm, usually the last joint, or with keywords like gripper, hand, palm.
For example, in OpenLoong, we choose:
(11, b'J_arm_r_palm', 4, -1, -1, 0, 0.0, 0.0, 0.0, -1.0, 0.0, 0.0, b'Link_arm_r_palm', (0.0, 0.0, 0.0), (0.007859, 0.00817000000000001, 0.037736), (0.0, 0.0, 0.0, 1.0), 10)
(47, b'J_arm_l_palm', 4, -1, -1, 0, 0.0, 0.0, 0.0, -1.0, 0.0, 0.0, b'Link_arm_l_palm', (0.0, 0.0, 0.0), (0.0077872, -0.30705, 0.027733), (0.0, 0.0, 0.0, 1.0), 46)
In the URDF, find the corresponding link, add EE link and joint, pay attention to the dependency order of the URDF tree:
  <link name="io_teleop_ee_link_left"/>
  <joint name="io_teleop_ee_joint_left" type="fixed">
    <origin rpy="0 0 0" xyz="0 0 0"/>
    <parent link="Link_arm_l_palm"/>
    <child link="io_teleop_ee_link_left"/>
  </joint>
  <link name="io_teleop_ee_link_right"/>
  <joint name="io_teleop_ee_joint_right" type="fixed">
    <origin rpy="0 0 0" xyz="0 0 0"/>
    <parent link="Link_arm_r_palm"/>
    <child link="io_teleop_ee_link_right"/>
  </joint>
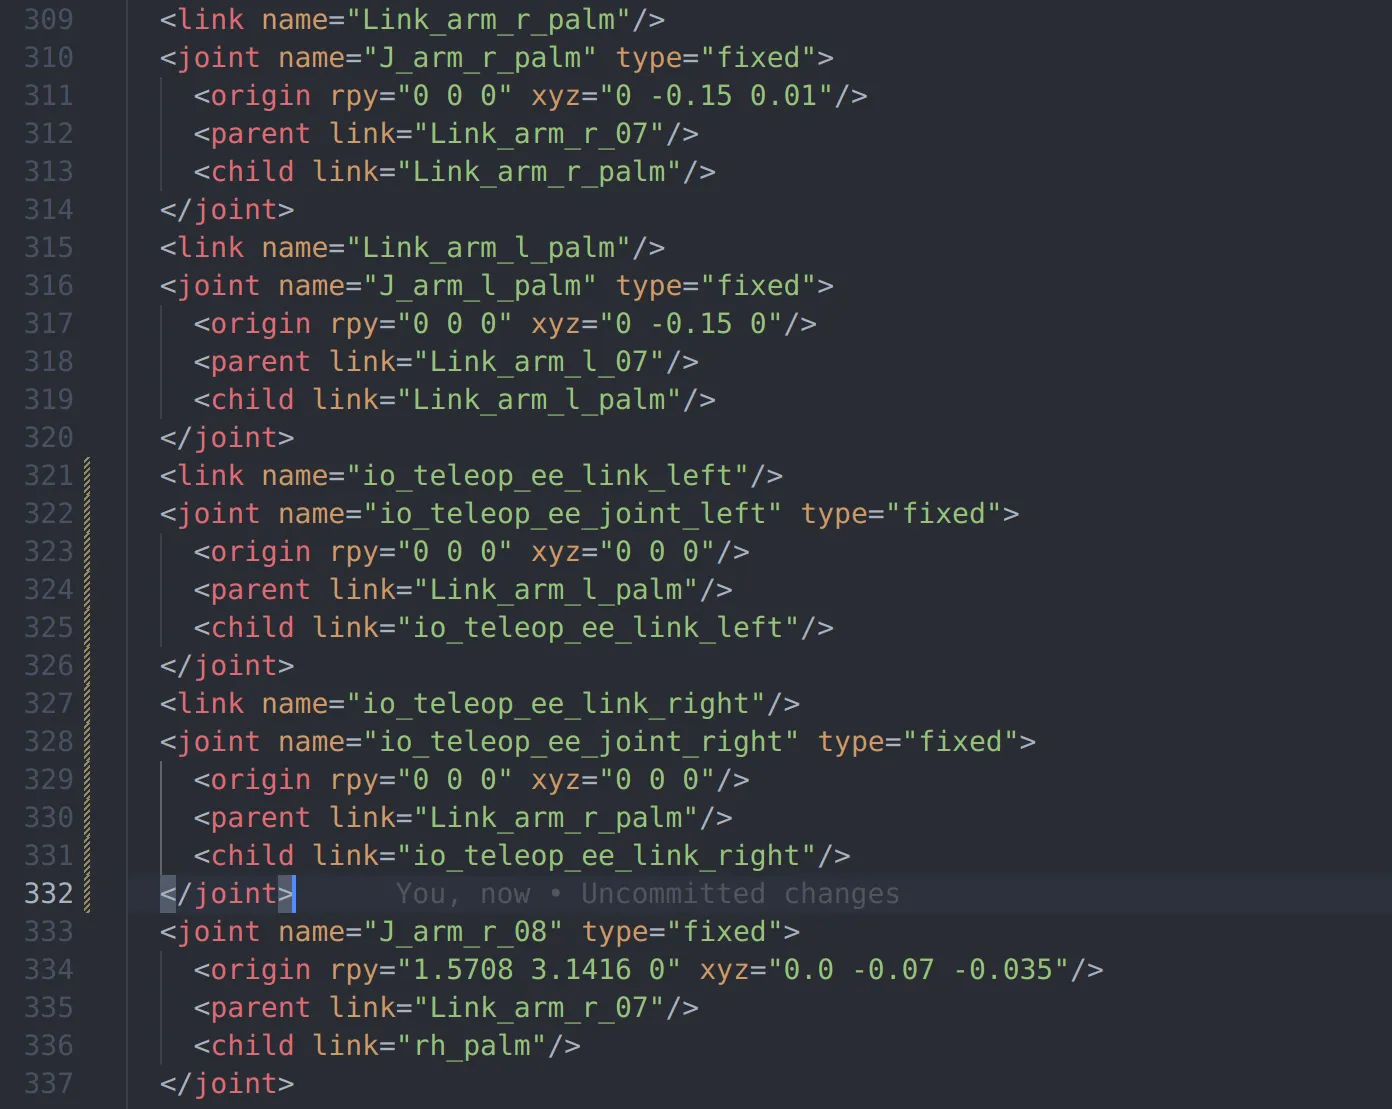
After adding, run the Adjust the Robot's Home Pose script again,
Record the arm joint IDs (the first element printed in each line) and the EE link IDs from the terminal print information.
For OpenLoong, it should be:
joint_id_dt = {
    "right_arm_joint_ids": [4, 5, 6, 7, 8, 9, 10],
    "left_arm_joint_ids": [41, 42, 43, 44, 45, 46, 47],
}

ee_id_dt = {"right_ee_link_id": 12, "left_ee_link_id": 49}
In the OpenLoong path, run the following Python 3 script to visualize the EE coordinate system
import pybullet as p
import time
import numpy as np


def debug_draw_pose(pose, replace_line_ids=None, line_width=5, line_length=0.3):
    axes = np.identity(3) * line_length
    colors = np.identity(3)
    line_ids = [] if replace_line_ids is None else replace_line_ids
    for i in range(3):
        if replace_line_ids is None:
            line_id = p.addUserDebugLine(
                lineFromXYZ=pose[0],
                lineToXYZ=p.multiplyTransforms(pose[0], pose[1], axes[i], [0, 0, 0, 1])[
                    0
                ],
                lineColorRGB=colors[i],
                lineWidth=line_width,
                lifeTime=0,
            )
            line_ids.append(line_id)
        else:
            p.addUserDebugLine(
                lineFromXYZ=pose[0],
                lineToXYZ=p.multiplyTransforms(pose[0], pose[1], axes[i], [0, 0, 0, 1])[
                    0
                ],
                lineColorRGB=colors[i],
                lineWidth=line_width,
                lifeTime=0,
                replaceItemUniqueId=replace_line_ids[i],
            )
    return line_ids


p.connect(p.GUI)
robot_id = p.loadURDF("azureloong_description/urdf/AzureLoong_sr.urdf")
joint_id_dt = {
    "right_arm_joint_ids": [4, 5, 6, 7, 8, 9, 10],
    "left_arm_joint_ids": [41, 42, 43, 44, 45, 46, 47],
}
ee_id_dt = {"right_ee_link_id": 12, "left_ee_link_id": 49}
# joint home is list concat of right and left arm home pos, it must be right arm first then left arm
joint_home = [0.20, -0.97, -2.00, 1.70, 0.63, 0.00, -0.43] +
             [-0.20, -0.97, 2.00, 1.70, -0.63, 0.00, 0.43]
joint_ids = [id for ids in joint_id_dt.values() for id in ids]
ee_ids = [id for id in ee_id_dt.values()]
for i in range(p.getNumJoints(robot_id)):
    if i in joint_ids:
        p.resetJointState(robot_id, i, joint_home[joint_ids.index(i)])
    if i in ee_ids:
        debug_draw_pose(p.getLinkState(robot_id, i)[4:6], line_width=10)

while 1:
    time.sleep(0.1)
Correct operation should display the following visualization interface
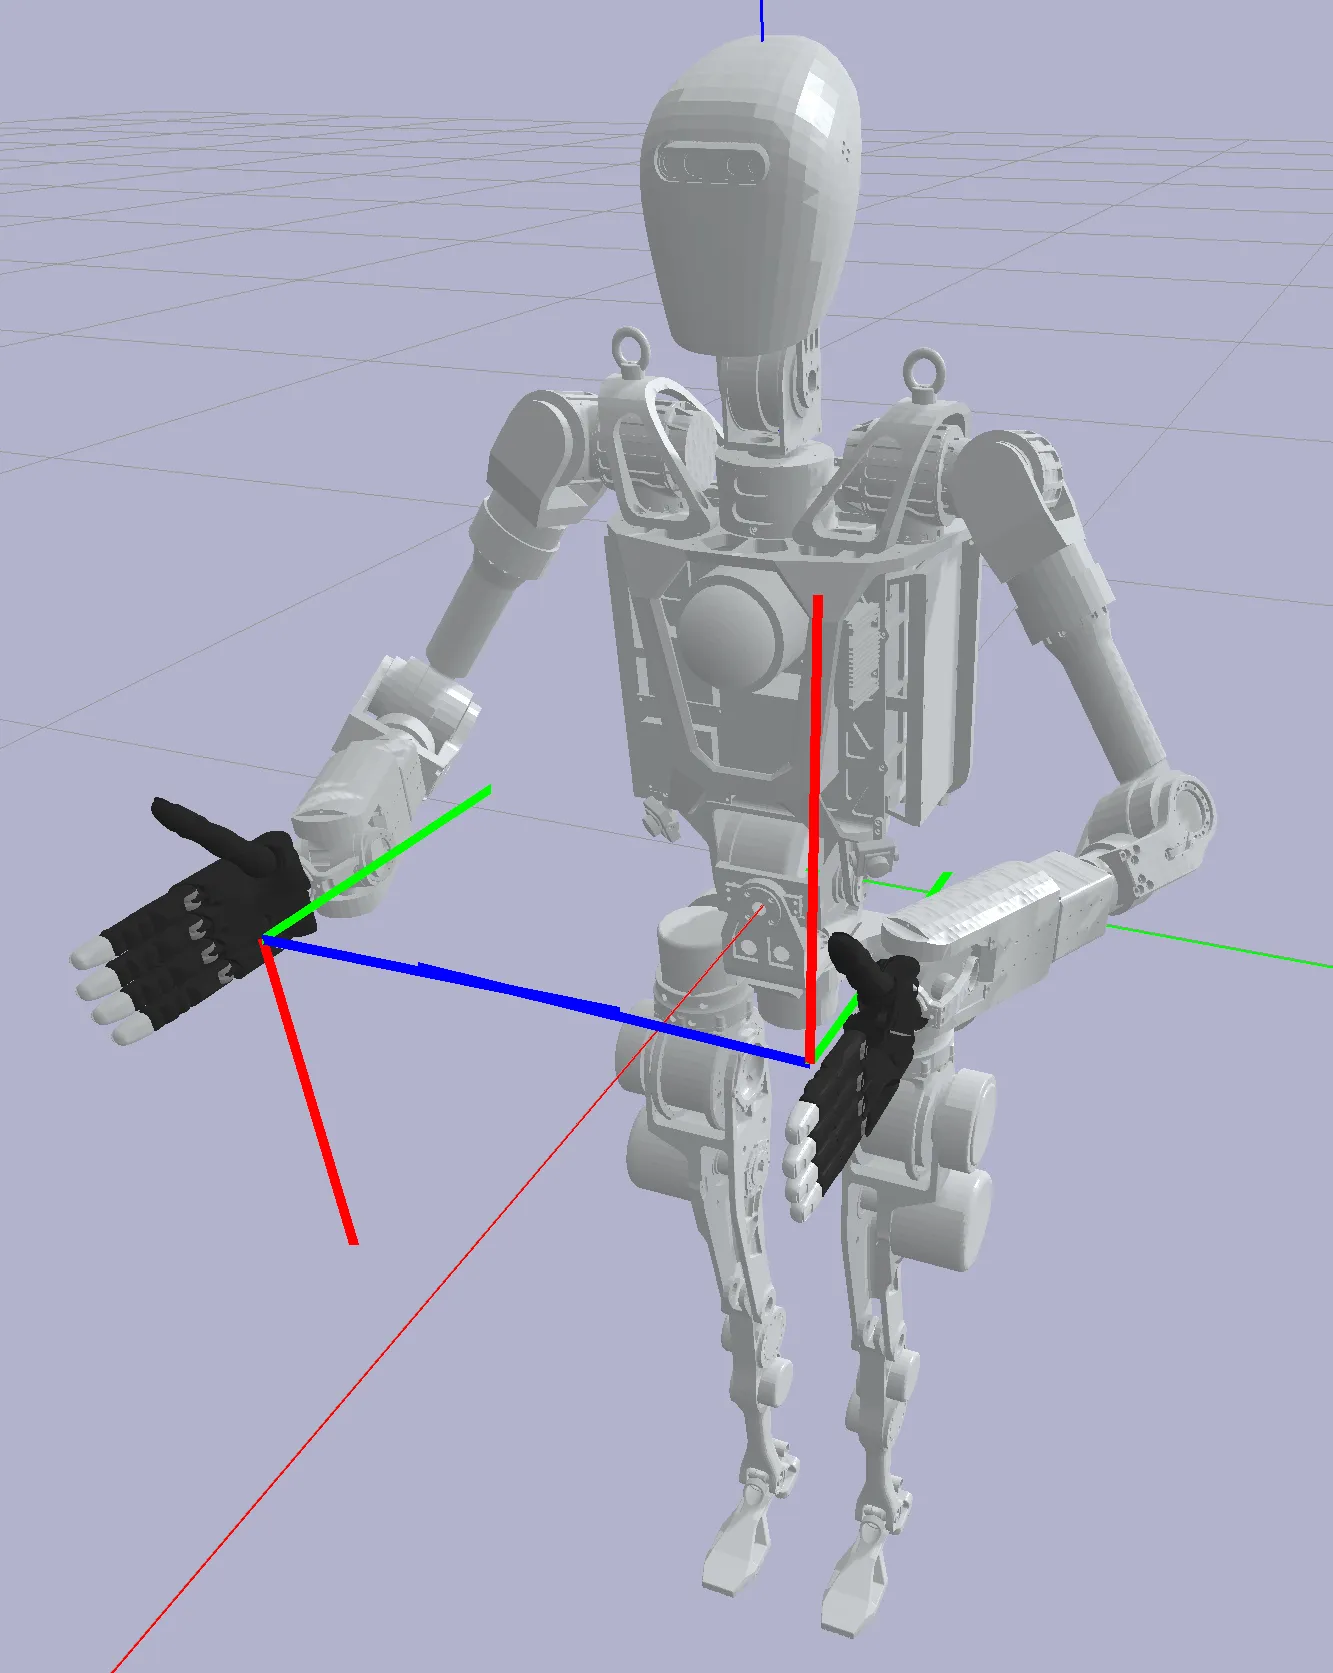
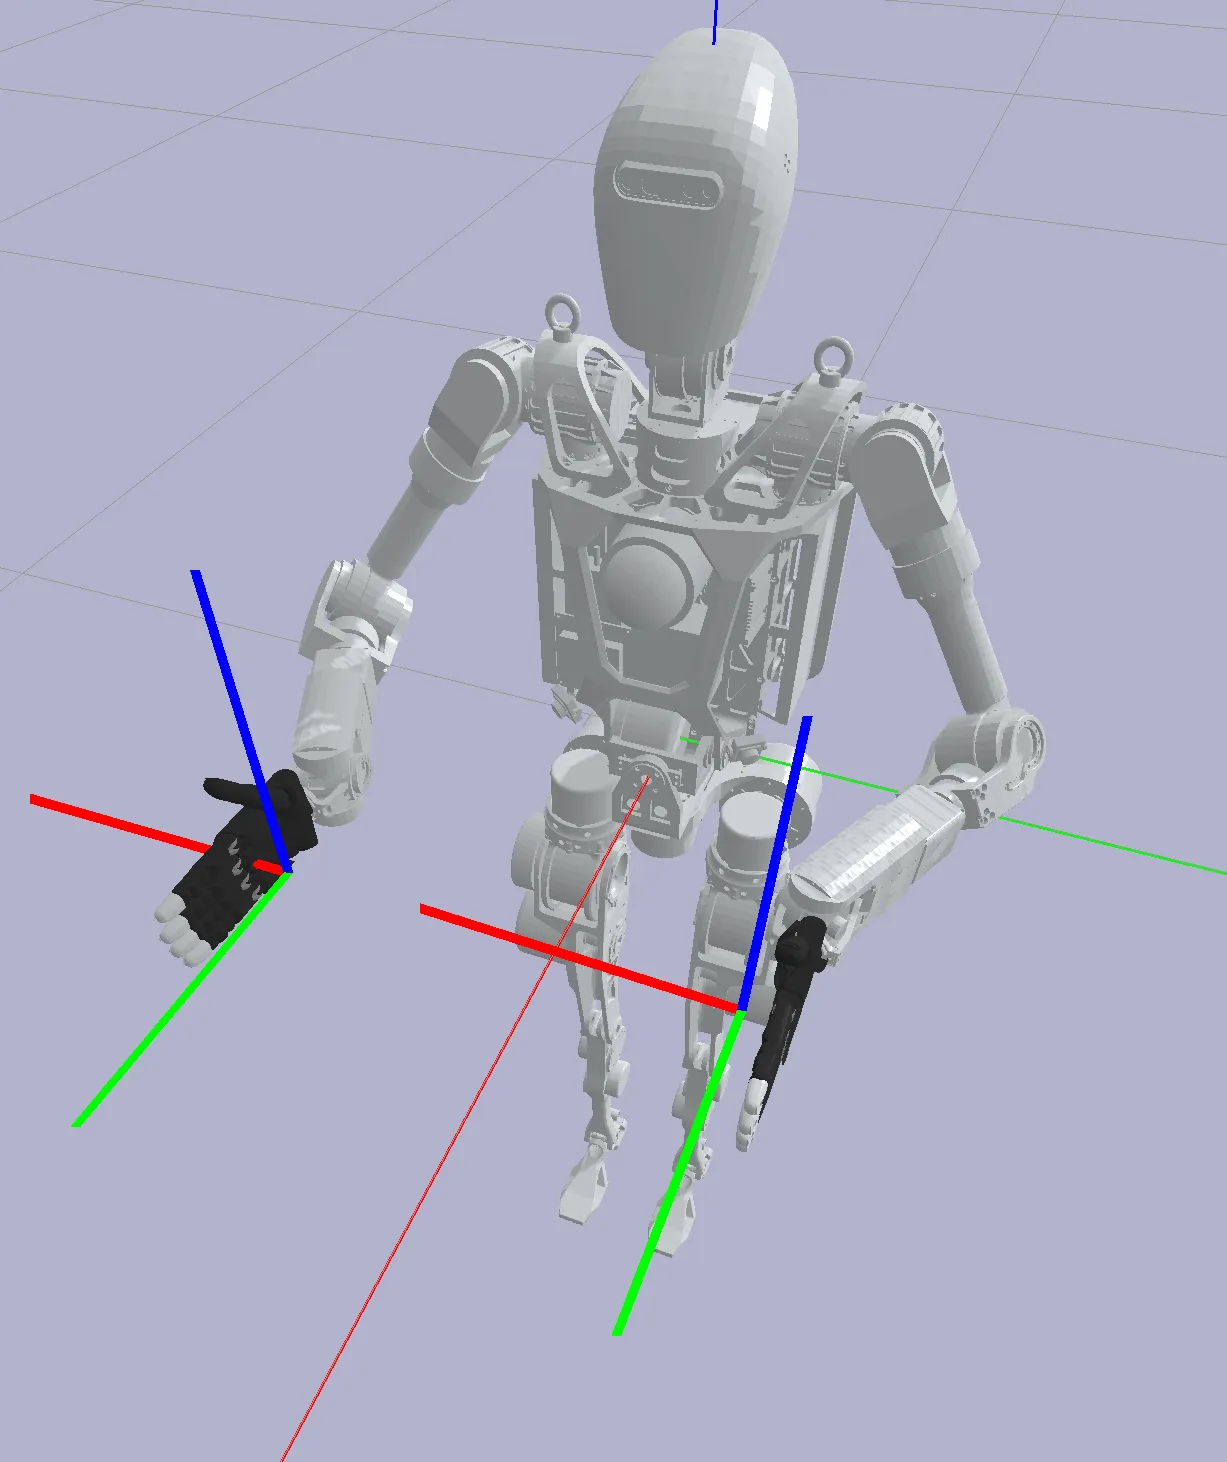
Next, by modifying the origin rpy and xyz fields of io_teleop_ee_joint_right and io_teleop_ee_joint_left in the URDF,
Adjust the position and pose of the EE link to meet:
- The position falls at the center of the palm (or gripper) (TCP)
- The Z-axis is vertically upward
- The Y-axis is parallel to the hand surface and facing forward (from the robot's perspective, facing the front of the robot base)
Small tip: For fixed-axis rotation in pybullet
For the AzureLoong robot, the adjusted result should be:
  <link name="io_teleop_ee_link_left"/>
  <joint name="io_teleop_ee_joint_left" type="fixed">
    <origin rpy="3.14 -1.57 0" xyz="0 0 0"/>
    <parent link="Link_arm_l_palm"/>
    <child link="io_teleop_ee_link_left"/>
  </joint>
  <link name="io_teleop_ee_link_right"/>
  <joint name="io_teleop_ee_joint_right" type="fixed">
    <origin rpy="3.14 1.57 0" xyz="0 0 0"/>
    <parent link="Link_arm_r_palm"/>
    <child link="io_teleop_ee_link_right"/>
  </joint>
4. Fill in the Configuration File
In the OpenLoong path, create a vr_configs.yml file
Add the vr_configs.yml file and fill in the following content:
(All values related to joint or link index can be obtained from the terminal print after running the Adjust the Robot's Home Pose script)
urdf_path: azureloong_description/urdf/AzureLoong_sr.urdf  # [required] Specify the URDF loading path, relative to the vr_configs.yml
robot_name: OpenLoong # [required] The name of the robot, consistent with the name of the folder one level above vr_configs.yml, naming rule is capitalized first letter
wo_controller: true # [required] Whether to use the IO general controller, if true, the IO general controller will not be used
base_pose: # [required] The base pose of the robot, the robot needs to be adjusted to: the Y-axis of the world coordinate system facing the front of the robot, the Z-axis facing the top of the robot, determine the specific values according to the following "Explanation of base_pose"
  position: [0, 0, 0.9]
  orientation: [0, 0, 0.707, 0.707]
arms: # [required] The joint index of the arm, the ee_link index, and the joint angles (rad) in the home pose, refer to the content in the "Adjust the Robot's Home Pose" section. Note!: Right arm first, then left arm
- joint_index: [4, 5, 6, 7, 8, 9, 10] # Right arm joint index
  ee_index: 12 # Right hand ee link index
  rest_j_pos: [0.20, -0.97, -2.00, 1.70, 0.63, 0.00, -0.43] # Right arm home pose
- joint_index: [41, 42, 43, 44, 45, 46, 47] # Left arm joint index
  ee_index: 49 # Left hand ee link index
  rest_j_pos: [-0.20, -0.97, 2.00, 1.70, -0.63, 0.00, 0.43] # Left arm home pose
grippers: # [optional] For robots with end effectors, you can add the corresponding joint index here. Note!: Right hand first, then left hand
- joint_index: [36, 37, 38, 15, 16, 17, 20, 21, 22, 25, 26, 27, 31, 32, 33] # All joint indexes of the right hand, can be sorted according to the value order below, if there are no fingers (such as a two-finger gripper), sort by index size
  thumb: [36, 37, 38] # Right thumb joint index
  index: [15, 16, 17] # Right index finger joint index
  middle: [20, 21, 22] # Right middle finger joint index
  ring: [25, 26, 27] # Right ring finger joint index
  pinky: [31, 32, 33] # Right pinky joint index
- joint_index: [74, 75, 76, 53, 54, 55, 58, 59, 60, 63, 64, 65, 69, 70, 71] # All joint indexes of the left hand
  thumb: [74, 75, 76] # Left thumb joint index
  index: [53, 54, 55] # Left index finger joint index
  middle: [58, 59, 60] # Left middle finger joint index
  ring: [63, 64, 65] # Left ring finger joint index
  pinky: [69, 70, 71] # Left pinky joint index
waist: # [optional] For robots with waist joints, you can add the corresponding joint index here
  joint_index: [79, 80, 81] # joint index
  rest_j_pos: [0, 0, 0] # Joint angles (rad) in the home pose, generally all values are 0
fixed_link: "Link_waist_yaw" # [optional] For robots with waist joints, you can specify the robot link you want to fix, generally the last link of the waist joint, if this field is not filled, the default is the robot's base link
head: # [optional] For robots with waist joints, you can add the corresponding joint index here
 joint_index: [-1, 3, 2] # Note, the order of the head joints should be: [roll, pitch, yaw], missing joints are filled with -1
 rest_j_pos: [-1, 0, 0] # Joint angles (rad) in the home pose, generally all values are 0, similarly, missing joint angles are also filled with -1
controller_indices: # [optional], if the value of "wo_controller" is "false", this is mandatory, otherwise it can be left blank
  cmd_ee: [10, 47] # The ee link index sent to the controller (right hand first, then left hand), generally may be different from the index specified in "arms", may be the last output axis of the robot, specifically based on the real robot control interface.
  base: [1, 1] # The base link index sent to the controller (right hand first, then left hand), declare which coordinate system the target ee pose is relative to, specifically based on the real robot control interface. If it is the first link in the urdf tree, fill in -1
dorsal: # [optional] For robots with a single trunk lifting degree of freedom, generally does not coexist with the "waist" keyword, here is just an example of all configs
  joint_index: 10  # joint index
dorsal_move_scale: 0.1 # [optional] For robots with a single trunk lifting degree of freedom, this is used to control the lifting speed
base_move_scale: [0.1, 0.1] # [optional] For robots with movable bases, this is used to control the translation speed and rotation speed
vibration_thresholds: # [optional] You can control the vibration of the VR handle through the following content
  ee_dist: [0.15, 0.2] # If the distance between the ee links of the left and right hands is within this range, the handle vibrates
  tabletop_height: 0.85 # Set the table height, if the Z coordinate of the ee link is close to this value, the handle vibrates
  collision: true # If set to true, the handle vibrates when the gripper collides with an object
non_fixed_joint_ids: [4, 5, 6, 7, 8, 9, 10, 36, 37, 38, 15, 16, 17, 20, 21, 22, 25, 26, 27, 31, 32, 33,
  41, 42, 43, 44, 45, 46, 47, 74, 75, 76, 53, 54, 55, 58, 59, 60, 63, 64, 65, 69, 70, 71, 2, 3] # [required] In the VR app, we can visualize the movement of the robot. Here you can specify the index of all robot joints that you want to move in the VR APP, generally the joint index in "arms", "grippers", "waist"("dorsal"), "head" above, no need to care about the order
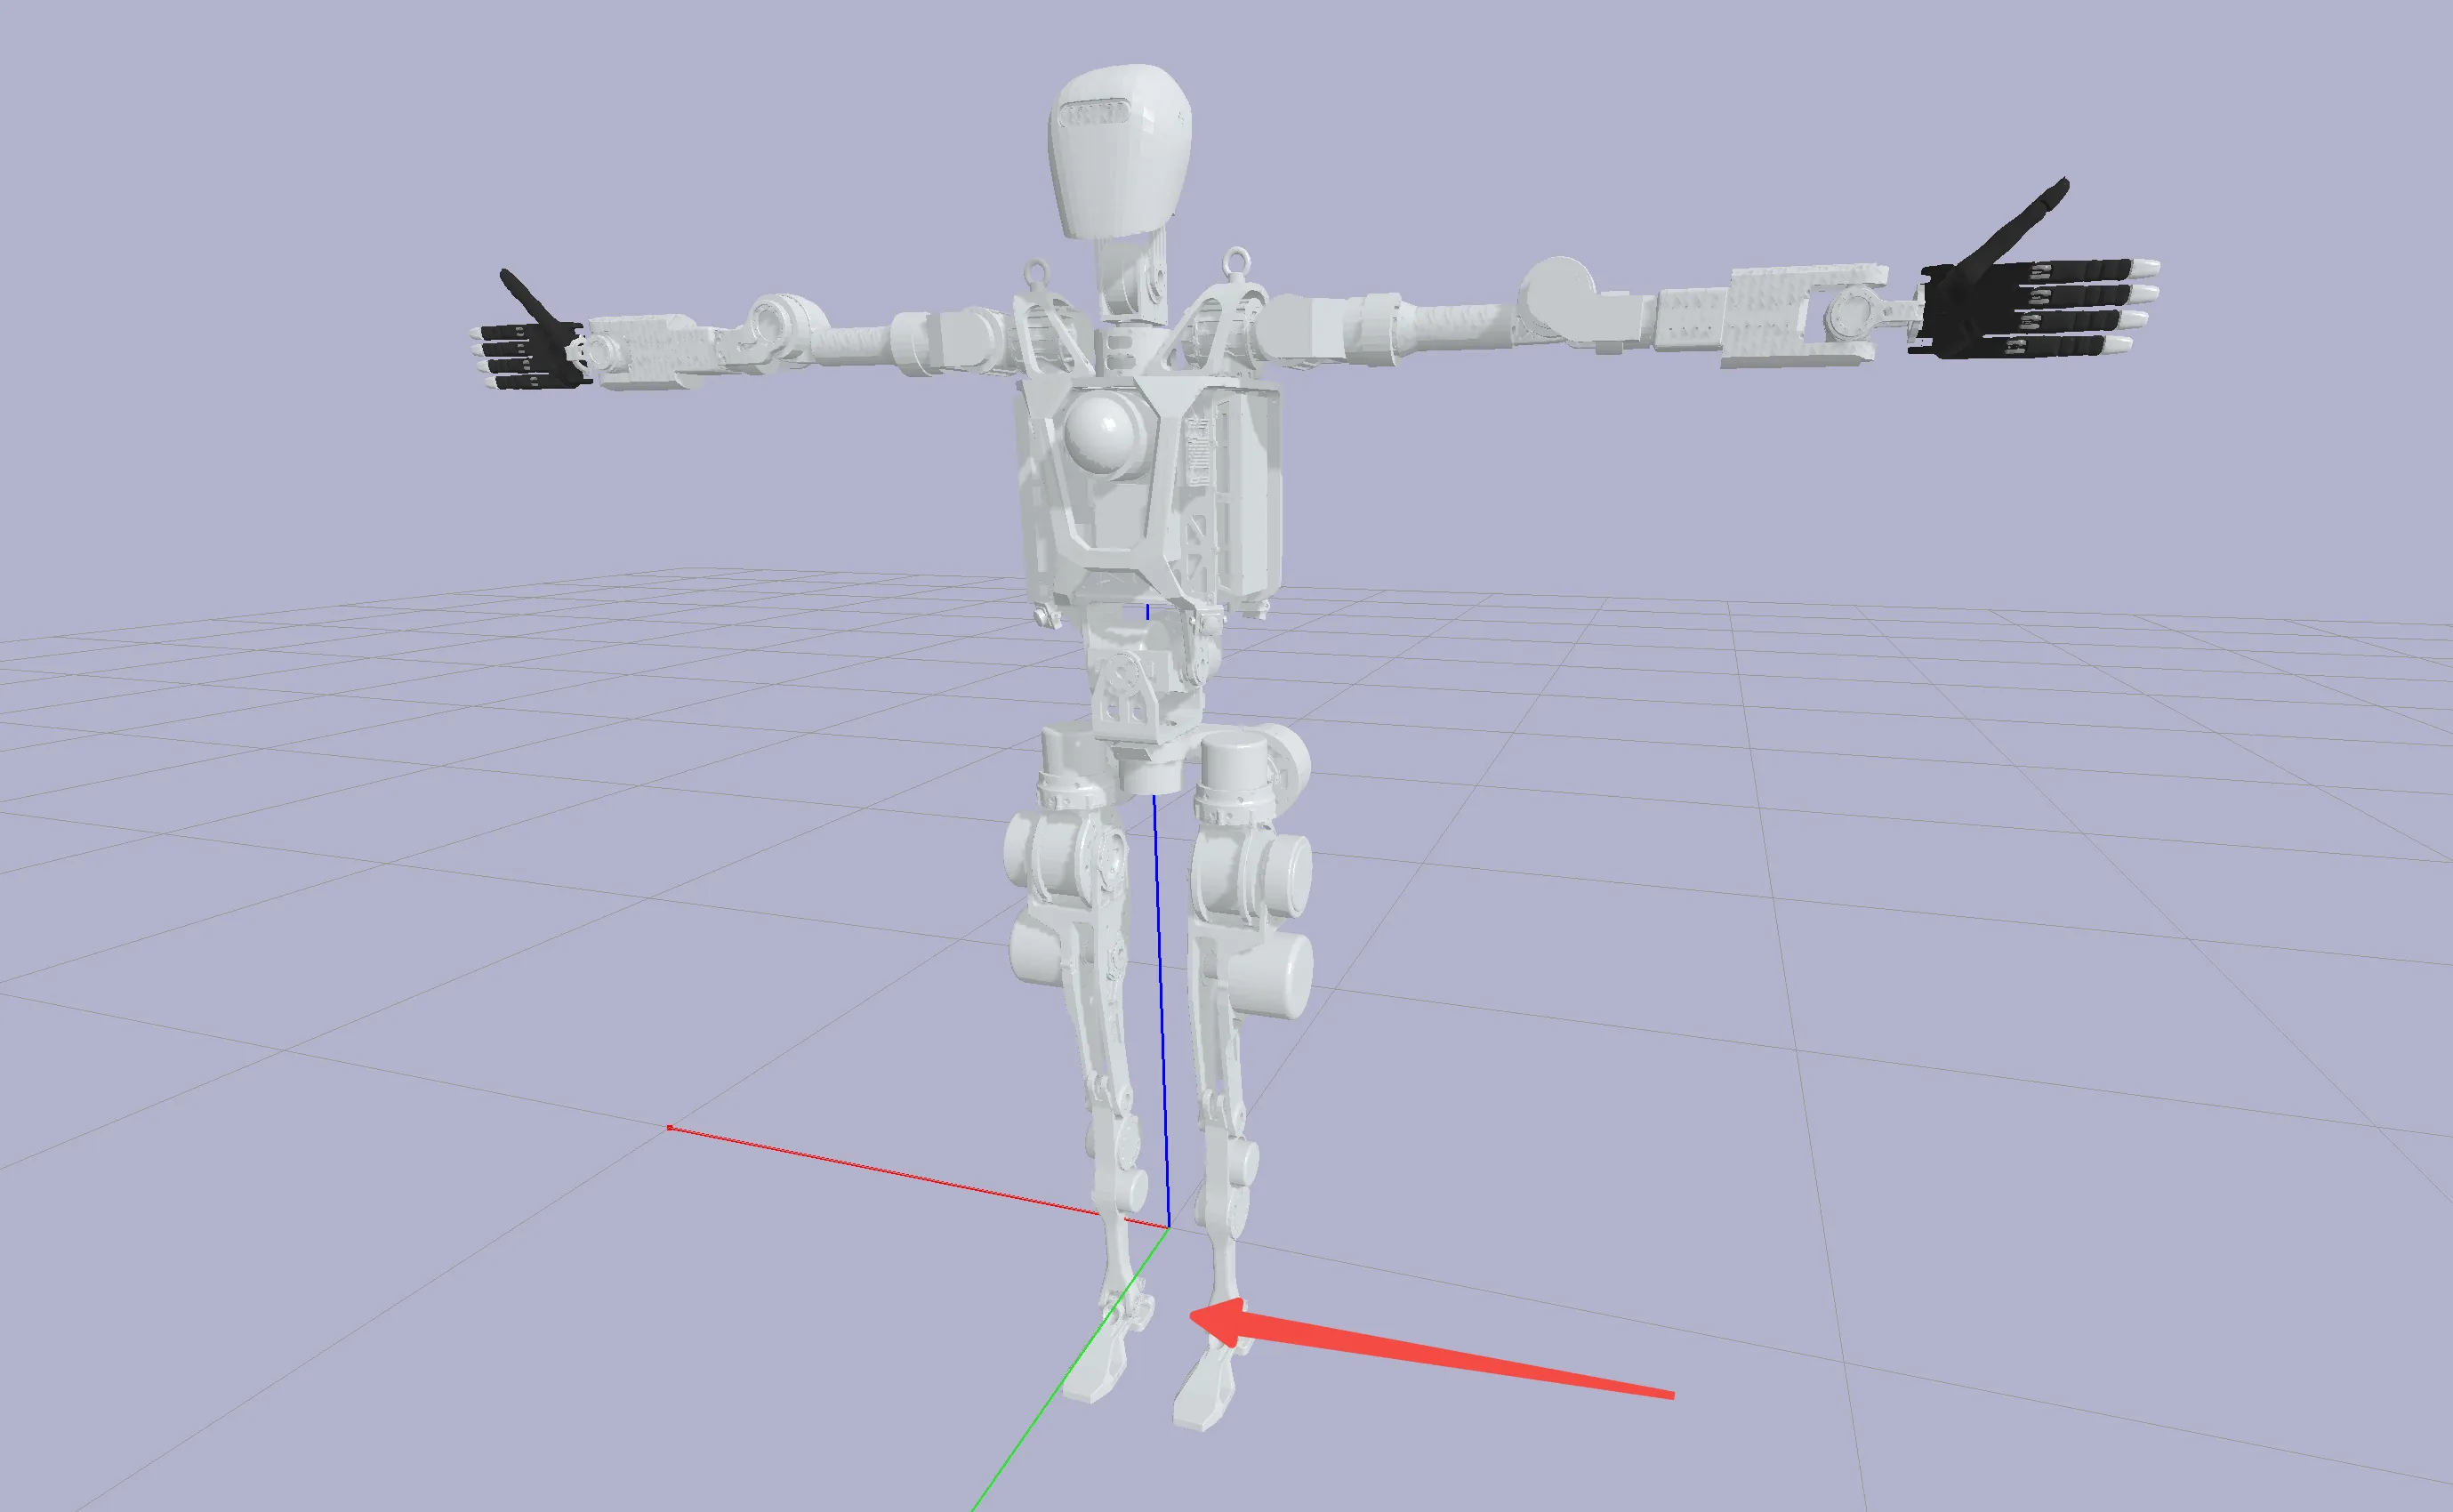
Explanation of base_pose
base_pose is the base pose of the robot,
The robot's pose needs to be adjusted to: the Y-axis of the world coordinate system facing the front of the robot, the Z-axis facing the top of the robot;
No mandatory modification is made to the position, but the height of the robot can be adjusted to align its bottom with the ground.
In the OpenLoong path, use the following Python 3 script to test:
import pybullet as p
import time

p.connect(p.GUI)
p.loadURDF(
    "azureloong_description/urdf/AzureLoong_sr.urdf",
    basePosition=[0, 0, 0.9],
    baseOrientation=[0, 0, 0.707, 0.707],
)
while 1:
    time.sleep(0.1)
5. Verify the Configuration File
Next, pull the demonstration code repository provided by IO, which should run on the robot's industrial control computer. This repository depends on the ROS1 environment
git clone https://github.com/ioai-tech/TeleXperience_robot_ros1_ws
cd TeleXperience_robot_ros1_ws
catkin build
source devel/setup.bash
In this repository, there is an original demonstration folder containing the configuration file for OpenLoong. You can copy it to another path or delete it and replace it with the file generated above.
After connecting all TeleXperience devices, first start roscore in one terminal
export ROS_IP=192.168.123.24
export ROS_MASTER_URI=http://192.168.123.24:11311
roscore
Then run the following command to start the simulation robot's controller-free control node
cd TeleXperience_robot_ros1_ws
export ROS_IP=192.168.123.24
export ROS_MASTER_URI=http://192.168.123.24:11311
python3 src/io_teleop_robot_control_node/scripts/uni_constraint_control_node.py --robot_name OpenLoong
After starting teleoperation, the robot should be able to move following the movement of the headset and handles.