Overview: From Human to Robot
Understand the engineering behind humanoid robots in 30 minutes
1. Training
- GPU: Nvidia RTX 3070/4060, 8 GB VRAM
- RAM: 16 GB
- Disk Space: 200 GB
1.1 Environment Setup
[Recommended] Setup with ioenv_cli
We recommend using our ioenv_cli to deploy the training environment with a single command.
-
Install Dependencies
-
Clone
ioenv_cligit clone https://github.com/ioai-tech/ioenv_cli.git
-
Load Environment Variables
cd ioenv_cli
source ioenv.sh -
List available images with
ioenv listioenv list
ENVIRONMENT IMAGE CONTAINER STATUS
----------- ----- --------- ------
isaaclab yes yes running
mujocosim yes -- --
onboard -- -- -- -
Pull an image with
ioenv pull <ENVIRONMENT>ioenv pull isaaclabtipIf Docker Hub is not accessible in your region, use
ioenv pull <ENVIRONMENT> --from-mirrorto pull the Docker image from a mirror server. -
Start an image with
ioenv run <ENVIRONMENT>. If the image does not exist locally, it will be pulled automatically before starting.ioenv run isaaclab-
After running, a shared folder
isaaclab_wswill be created under$HOME/ioenv_ws. You can use this folder to transfer files between$HOME/ioenv_ws/isaaclab_wson the host and$HOME/workspaceinside Docker. Run the following command to change the permissions of theisaaclab_wsdirectory:# On the host machine
sudo chown $USER:$USER $HOME/ioenv_ws/isaaclab_ws -
The frameworks needed for training are located in the
/optdirectory inside the Docker container.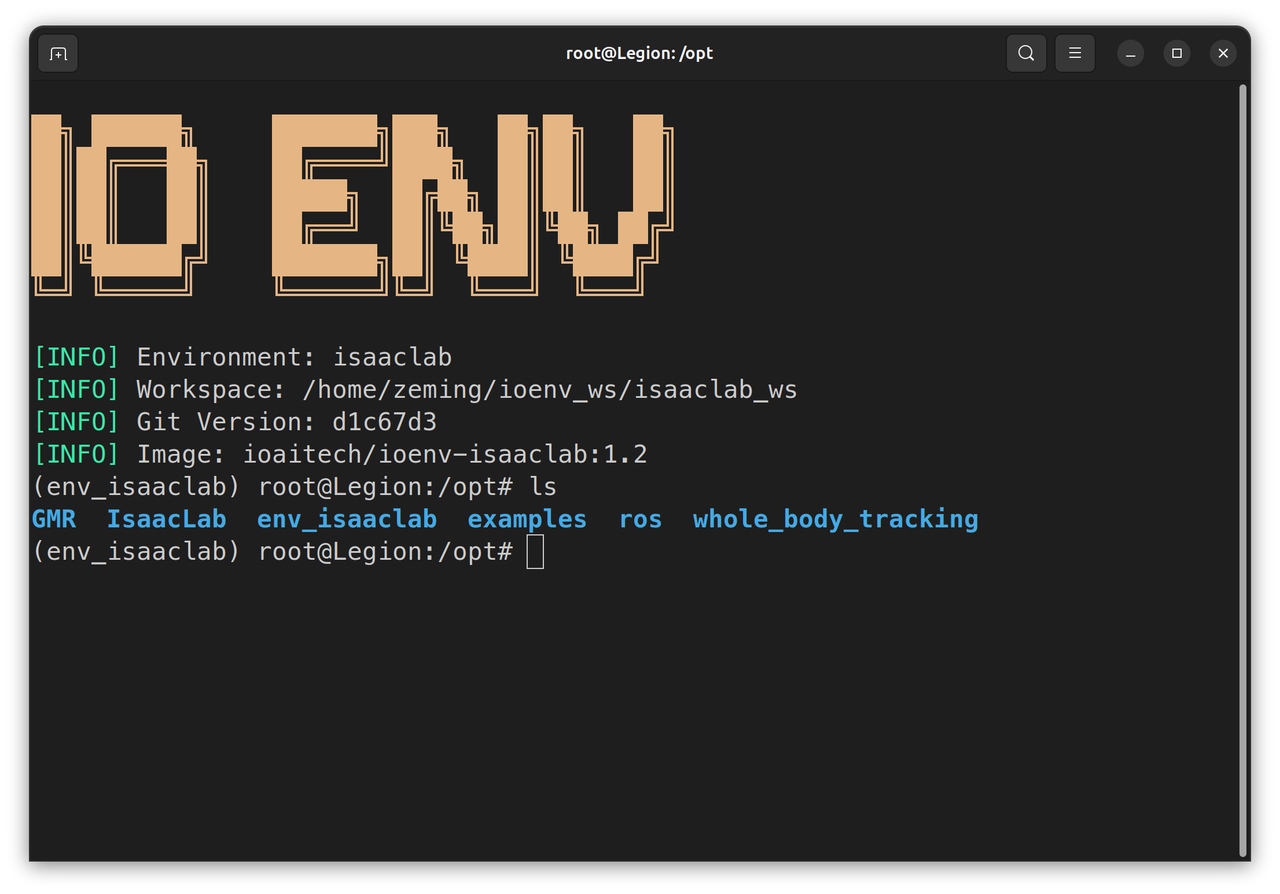
-
Manual Setup
Manual setup only supports training the Unitree G1.
-
Install
IsaacLabv2.1.0 (~30 minutes) Download-
We recommend installing
uvas your Python package managercurl -LsSf https://astral.sh/uv/install.sh | sh -
Create the
env_isaaclabvirtual environment usingvenvcd /opt
sudo mkdir -p env_isaaclab
sudo chown -R $USER:$USER env_isaaclab
uv venv --python 3.10 env_isaaclab
source env_isaaclab/bin/activate -
Install
torchandisaacsimin the virtual environment# For CUDA 12 users
uv pip install torch==2.9.1 torchvision --index-url https://download.pytorch.org/whl/cu121
uv pip install --upgrade pip
uv pip install 'isaacsim[all,extscache]==4.5.0' --extra-index-url https://pypi.nvidia.com -
Clone the
IsaacLabrepository, switch to therelease/2.1.0branch, and run the install scriptcd /opt
sudo git clone https://github.com/isaac-sim/IsaacLab.git
sudo chown -R $USER:$USER IsaacLab
cd IsaacLab
git checkout release/2.1.0
sudo apt install cmake build-essential
./isaaclab.sh --install # or "./isaaclab.sh -i"
-
-
Install
GMR(~10 minutes)-
Clone
GMRand install with pipcd /opt
sudo git clone https://github.com/YanjieZe/GMR
sudo chown -R $USER:$USER GMR
uv pip install -e GMR -
Download the SMPLX model and copy it to
GMR/assets/body_models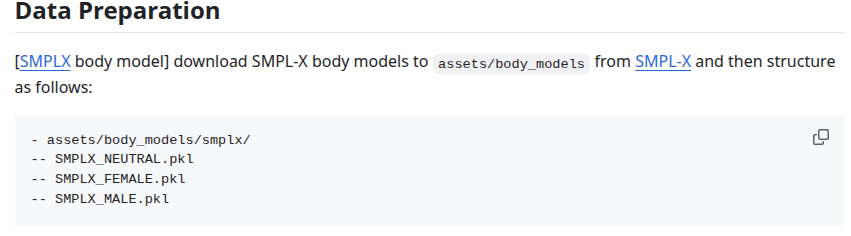
-
-
Install
whole_body_tracking(~5 minutes)-
Clone
whole_body_trackingand install with pipcd /opt
sudo git clone https://github.com/HybridRobotics/whole_body_tracking.git
sudo chown -R $USER:$USER whole_body_tracking
cd whole_body_tracking
uv pip install -e source/whole_body_tracking -
Download
unitree_descriptionscurl -L -o unitree_description.tar.gz https://storage.googleapis.com/qiayuanl_robot_descriptions/unitree_description.tar.gz && \
tar -xzf unitree_description.tar.gz -C source/whole_body_tracking/whole_body_tracking/assets/ && \
rm unitree_description.tar.gz -
Register a Wandb account at https://wandb.ai, log in from the terminal, and save
WANDB_API_KEYto your.bashrc$ wandb login
wandb: Currently logged in as: fox-io-ai (ioai) to https://api.wandb.ai. Use `wandb login --relogin` to force relogin
-
1.2 Training Pipeline
The following commands must be run inside the env_isaaclab virtual environment.
-
Activate the virtual environment
cd /opt/env_isaaclab
source bin/activate -
Run the
GMRretargeting script to remap SMPLX motion files to a specified robot and record a preview videowarningThe Docker image includes a relatively safe motion file
/opt/examples/General_A4_-_Look_Around_stageii.npzfor testing. Please verify in simulation before deploying on a real robot. Real-world deployment requires the robot to be in a safe, open environment.cd /opt/GMR
# --robot {agibot_x2, unitree_g1} supports Agibot X2 and Unitree G1
python scripts/smplx_to_robot.py --smplx_file <path_to_smplx_data> --robot <robot_model> --save_path <path_to_save_robot_data.pkl> --rate_limit --record_video -
Convert the GMR retargeted pkl file to the
whole_body_trackingcsv formatpython scripts/batch_gmr_pkl_to_csv.py --folder <motion_saved_folder> -
Run the
whole_body_trackingconversion script to convert the csv file to npz format for training and upload it to your Wandb registrycd /opt/whole_body_tracking
# --robot {agibot_x2, unitree_g1} supports Agibot X2 and Unitree G1
python scripts/csv_to_npz.py --input_file <motion_name.csv> --robot <robot_model> --input_fps 30 --output_name <motion_name> --headless
# You need to manually exit after the conversion is completetipThe first time you run
whole_body_tracking, you need to log in to your Wandb account. Your account must already have a registry namedmotions. -
Preview motion files saved on Wandb (optional)
warningRunning this step with less than 32 GB of RAM may cause the system to freeze.
# --robot {agibot_x2, unitree_g1} supports Agibot X2 and Unitree G1
python scripts/replay_npz.py --robot <robot_model> --registry_name=<your-organization>-org/wandb-registry-motions/<motion_name> -
Run the
whole_body_trackingtraining script-
(Unitree G1) Select the training task
Tracking-Flat-G1-Wo-State-Estimation-v0to avoid instability caused by state estimation errors
python scripts/rsl_rl/train.py --task=Tracking-Flat-G1-Wo-State-Estimation-v0 --registry_name <your-organization>-org/wandb-registry-motions/<motion_name> --headless --logger wandb --log_project_name <experiment_name> --run_name <run_name> -
(Agibot X2) Select the training task
Tracking-Flat-X2-Wo-State-Estimation-v0python scripts/rsl_rl/train.py --task=Tracking-Flat-X2-Wo-State-Estimation-v0 --registry_name <your-organization>-org/wandb-registry-motions/<motion_name> --headless --logger wandb --log_project_name <experiment_name> --run_name <run_name> -
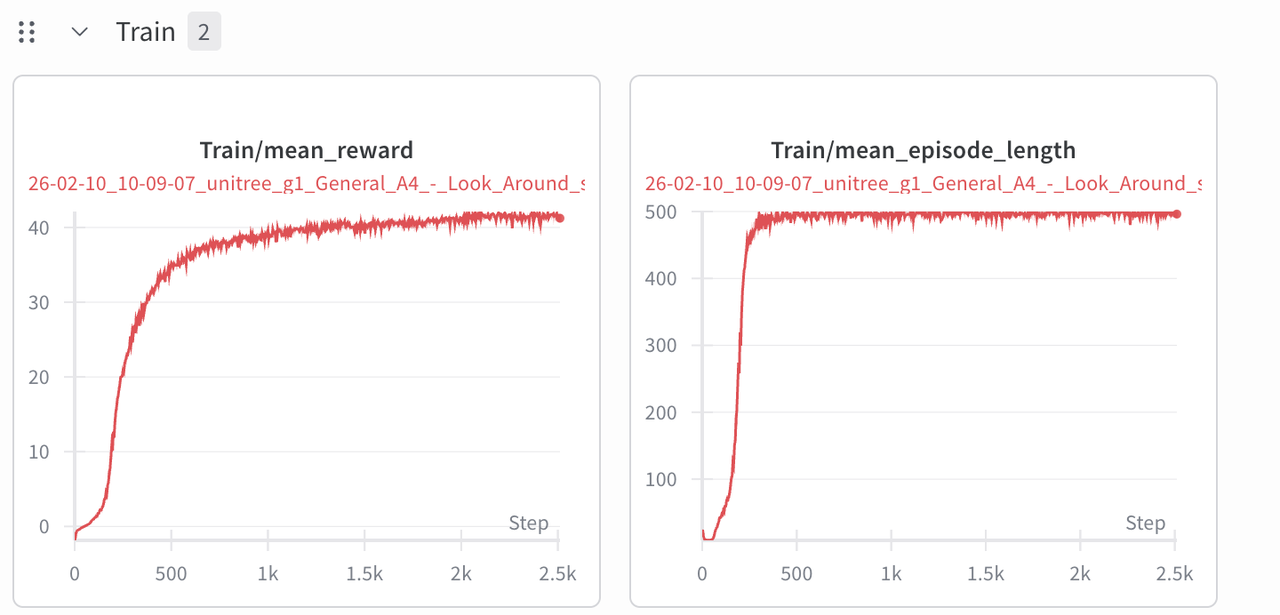
Log in to Wandb and monitor the training process. The model approaches convergence at around 2.5k iterations.
-
-
During training, run the
whole_body_trackingevaluation script to check the current model's tracking performancewarningRunning this step with less than 32 GB of RAM may cause the system to freeze. With less than 8 GB of VRAM, it is recommended to stop training before running evaluation.
python scripts/rsl_rl/play.py \
    --task=Tracking-Flat-G1-Wo-State-Estimation-v0 \
    --num_envs=2 \
    --wandb_path=<wandb_run_path>
Once the robot tracks motions accurately, you can proceed to Sim2Sim verification.
-
Training results are stored in
/opt/whole_body_tracking/logs/<robot>_flat/<wandb_run_name>. Move them to/root/workspaceto access from the host, or download from the Wandb run page.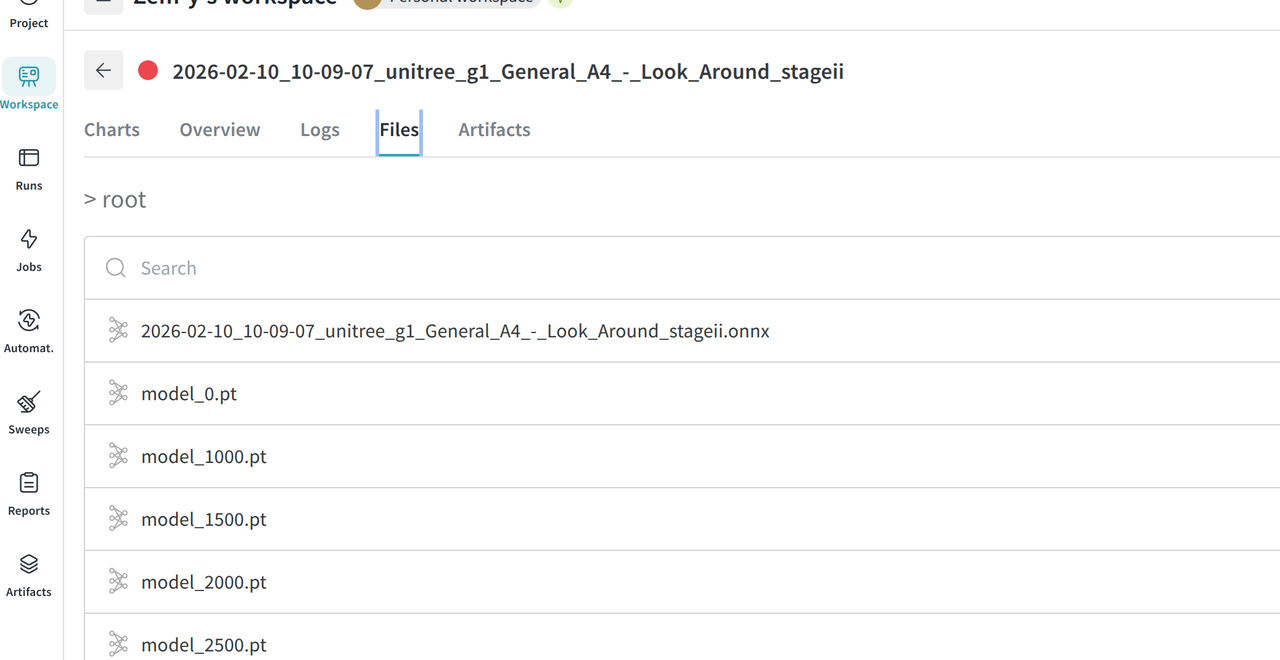
2. Simulation
2.1 Environment Setup
[Recommended] Setup with ioenv_cli
We recommend using our ioenv_cli to deploy the simulation environment with a single command.
-
Clone
ioenv_cligit clone https://github.com/ioai-tech/ioenv_cli.git -
Load Environment Variables
cd ioenv_cli
source ioenv.sh -
Pull the
mujocosimsimulation environment withioenv pull mujocosimioenv pull mujocosim -
Run the
mujocosimsimulation environmentioenv run mujocosimtipAn Xbox controller must be connected via USB or Bluetooth, otherwise you will see the following error:
docker: Error response from daemon: error gathering device information while adding custom device "/dev/input/js0": no such file or directory -
After running, a shared folder
mujocosim_wswill be created under$HOME/ioenv_ws. You can use this folder to transfer files between$HOME/ioenv_ws/mujocosim_wson the host and$HOME/workspaceinside Docker. Run the following command to change the directory permissions:# On the host machine
sudo chown $USER:$USER $HOME/ioenv_ws/mujocosim_ws -
Inside Docker, the
/optdirectory containsros2_wswith the originalmotion_tracking_controllerdeployment, andio_wswith our modified implementation.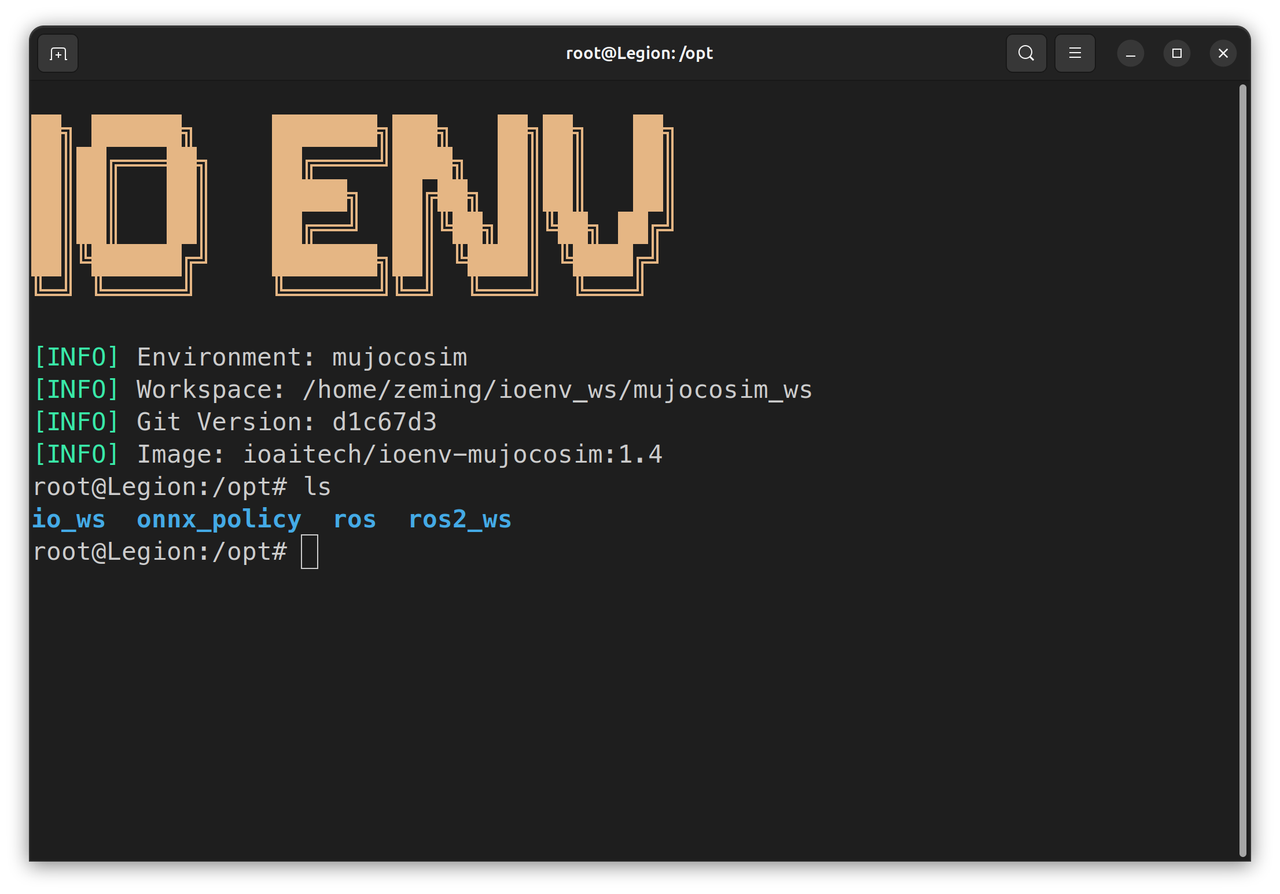
Manual Setup
-
Install ROS2 Humble Desktop (~30 minutes)
- Follow the official tutorial to install the full ROS2 distribution Installation Guide
-
Install
legged_control2(~10 minutes) Installation Guide# Add apt source
echo "deb [trusted=yes] https://github.com/qiayuanl/legged_buildfarm/raw/jammy-humble-amd64/ ./" | sudo tee /etc/apt/sources.list.d/qiayuanl_legged_buildfarm.list
echo "yaml https://github.com/qiayuanl/legged_buildfarm/raw/jammy_humble-amd64/local.yaml humble" | sudo tee /etc/ros/rosdep/sources.list.d/1-qiayuanl_legged_buildfarm.list
echo "deb [trusted=yes] https://github.com/qiayuanl/simulation_buildfarm/raw/jammy-humble-amd64/ ./" | sudo tee /etc/apt/sources.list.d/qiayuanl_simulation_buildfarm.list
echo "yaml https://github.com/qiayuanl/simulation_buildfarm/raw/jammy-humble-amd64/local.yaml humble" | sudo tee /etc/ros/rosdep/sources.list.d/1-qiayuanl_simulation_buildfarm.list
echo "deb [trusted=yes] https://github.com/qiayuanl/unitree_buildfarm/raw/jammy-humble-amd64/ ./" | sudo tee /etc/apt/sources.list.d/qiayuanl_unitree_buildfarm.list
echo "yaml https://github.com/qiayuanl/unitree_buildfarm/raw/jammy-humble-amd64/local.yaml humble" | sudo tee /etc/ros/rosdep/sources.list.d/1-qiayuanl_unitree_buildfarm.list
sudo apt-get update
sudo apt-get install -y \
ros-humble-legged-control-base \
ros-humble-mujoco-ros2-control \
ros-humble-unitree-description \
ros-humble-unitree-systems \
ros-humble-xacro \
ros-humble-rosbag2-storage-mcap -
Clone and build
motion_tracking_controller(~5 minutes)mkdir -p ros2_ws/src
cd ros2_ws/src
git clone https://github.com/qiayuanl/unitree_bringup.git
git clone https://github.com/HybridRobotics/motion_tracking_controller.git
cd motion_tracking_controller
git checkout 491efc416bbea8a943e83abff7207e26f5426bde
cd ../..
source /opt/ros/humble/setup.bash
colcon build --symlink-install --cmake-args -DCMAKE_BUILD_TYPE=Release --packages-up-to unitree_bringup motion_tracking_controller
2.2 Running the Simulation
-
Place the trained ONNX model in
$HOME/ioenv_ws/mujocosim_wson the host, which maps to/root/workspaceinside Docker. Pre-trained models are also available in/opt/onnx_policy. -
First, try the original
motion_tracking_controller. It will start executing the motion immediately after launch. However, since it does not switch to a standing policy after the motion ends, the robot will fall over.cd /opt/ros2_ws
source install/setup.bash
ros2 launch motion_tracking_controller mujoco.launch.py policy_path:=<onnx_policy.path>-
By default it uses the Unitree G1 model. Use
organization:=agibot robot_type:=x2to load the Agibot X2 model.ros2 launch motion_tracking_controller mujoco.launch.py organization:=agibot robot_type:=x2 policy_path:=<onnx_policy.path>
-
-
Now try our modified version. The launch script loads 5 modules:
-
state_estimator -
standby_controller -
stand_loop_controller -
motion_tracking_controller -
walking_controller
cd /opt/io_ws
source install/setup.bash
ros2 launch humanoid_controller mujoco.launch.py policy_path:=<onnx_policy.path>-
Double-click left mouse button to select a body part, Ctrl+right-click to drag, Xbox controller RB+Y to execute the motion.
-
Run the pre-trained models provided in
/opt/onnx_polcies/ -
By default it uses the Unitree G1 model. Use
organization:=agibot robot_type:=x2to load the Agibot X2 model.ros2 launch humanoid_controller mujoco.launch.py organization:=agibot robot_type:=x2 policy_path:=<onnx_policy.path> -
In the Agibot X2 configuration, use Xbox controller RB+X to execute the motion.
Note: The Agibot X2 URDF is not officially provided, which may lead to suboptimal training results.
-
3. Real Robot Deployment
Since the Unitree G1 natively runs ROS2 Foxy, but motion_tracking_controller is only released for ROS2 Humble and Jazzy, it must be run inside a Docker environment.
The Docker image contains pre-trained models in /opt/onnx_policy. Deploy on real robots with caution!
3.1 On-Board Environment Setup
- SSH into the robot's development compute unit and use our
ioenv_clito deploy the environment.
See Section 3.2 for instructions on SSH access to the robot's development compute unit.
-
Clone
ioenv_cligit clone https://github.com/ioai-tech/ioenv_cli.git -
Load Environment Variables
cd ioenv_cli
source ioenv.sh -
After running the
onboardenvironment, a shared folderonboard_wswill be created under$HOME/ioenv_ws. You can use this folder to transfer files between$HOME/ioenv_ws/onboard_wson the host and$HOME/workspaceinside Docker. Run the following command to change the directory permissions:# On the host machine
sudo chown $USER:$USER $HOME/ioenv_ws/onboard_ws
3.2 Running Real Robot Deployment
Deploying on Unitree G1
-
After powering on the robot, long-press
L2+R2on the controller to switch to debug mode. The robot's face LED strip will turn yellow. -
From your computer, SSH into the robot's Ubuntu environment, enter the
onboardenvironment, and run the control script.ssh unitree@<wlan_ip>
source ioenv_cli/ioenv.sh
ioenv run onboard -
On first launch, add the Unitree G1 environment variables to
/root/.bashrcecho "source /opt/robot_config/unitree_g1_setup.bash" >> /root/.bashrc
source /root/.bashrc -
Run the trained motion
source /opt/io_ws/install/setup.bash
ros2 launch humanoid_controller real.launch.py network_interface:=eth0 policy_path:=<onnx_policy.path>
Deploying on Agibot X2
-
After powering on the Agibot X2, SSH into the development compute unit (Orin NX)
ssh agi@10.0.1.41 # Wired connection -
From the development compute unit, access the motion control compute unit, stop the main control process, and load the controller driver
ssh agi@10.0.1.40
aima em stop-app mc # Stop the main control process
tmux new-session -d -s joy "ros2 launch teleop_twist_joy teleop-launch.py" # Load controller driver -
Return to the development compute unit, check the wireless network IP, and SSH in via Wi-Fi
ifconfig # Check wireless network IP
ssh agi@<wlan_ip> -
Start the onboard Docker image
cd ~/ioenv_cli
source ioenv.sh
ioenv run onboard -
On first run, add the Agibot X2 environment variables to
/root/.bashrcecho "source /opt/robot_config/lingxi_x2_setup.bash" >> /root/.bashrc
source /root/.bashrc -
Run the trained motion
source /opt/io_ws/install/setup.bash
ros2 launch humanoid_controller real.launch.py organization:=agibot robot_type:=x2 network_interface:=eth0 policy_path:=<onnx_policy.path>