Phase 1: Whole Body Teleoperation
Running the Sonic Simulation on a PC
- CPU: x86_64 architecture
- GPU: Nvidia RTX 3070/4060, 8 GB VRAM
- RAM: 16 GB
- Disk Space: 200 GB
Install Dependencies
- Install
DockerTutorial
You need to add your user to the docker group.
sudo usermod -aG docker $USER # Reboot required after running this
- Install
NVIDIA Container ToolkitTutorial
Download ioenv
git clone https://github.com/ioai-tech/ioenv_cli.git
- Load environment variables
echo 'source <path_to_ioenv_cli>/ioenv_cli/ioenv.sh' >> ~/.bashrc # Replace <path_to_ioenv_cli> with the local path to ioenv_cli
source ~/.bashrc
- List available images with
ioenv list
ioenv list

ENVIRONMENT          IMAGE      CONTAINER    STATUS
-----------          -----      ---------    ------
isaaclab             yes        --           --
mujocosim            --         --           --
onboard              --         --           --
sonic_onboard        --         --           --
sonic_sim            --         --           --
sonic_train          yes        yes          running
- Pull an image with
ioenv pull <ENVIRONMENT>
ioenv pull sonic_sim

# Mirror download for users in regions with limited Docker Hub access
ioenv pull sonic_sim --from-mirror
Running
# First terminal
ioenv run sonic_sim

cd /opt/GR00T-WholeBodyControl
source .venv_teleop/bin/activate
python gear_sonic/scripts/run_sim_loop.py
# Second terminal
ioenv run sonic_sim

cd /opt/GR00T-WholeBodyControl/gear_sonic_deploy
./deploy.sh sim --input-type zmq_manager

## If using keyboard input instead
./deploy.sh sim
# Third terminal
ioenv run sonic_sim

cd /opt/GR00T-WholeBodyControl
source .venv_teleop/bin/activate
python gear_sonic/scripts/pico_manager_thread_server.py --manager
Running XRoboToolkit on the Pico
Installation
-
Package URL: XRoboToolkit-PICO-1.1.1.apk
-
Download the package to your laptop, then connect the Pico to the laptop via USB.
-
Drag the package into the Pico's
Downloadfolder. -
Disconnect the USB cable and install from the Pico home screen.
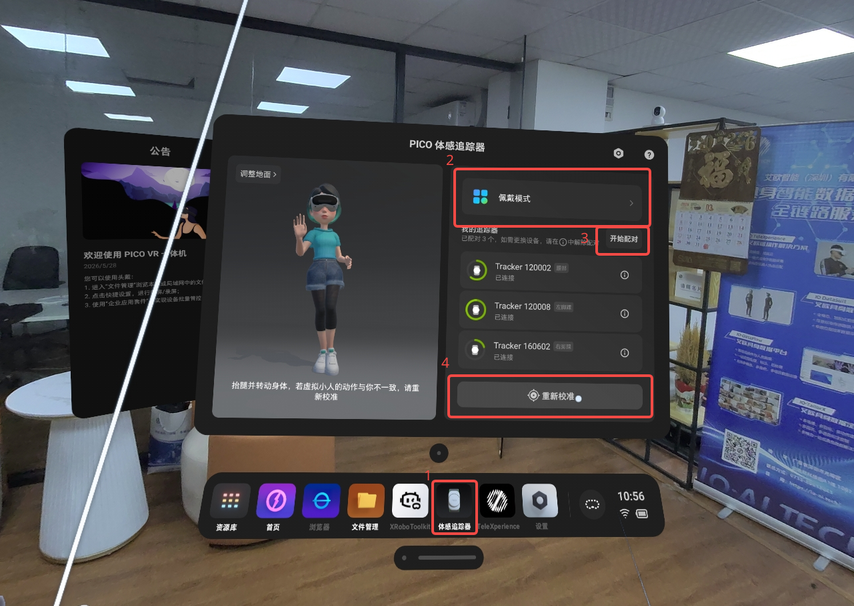
Calibration
-
Open the motion tracker.
-
Select the 3-tracker wearing mode.
-
Click "Start Pairing", then press and hold the button on the Pico motion tracker for 6 seconds to enter pairing mode.
-
Click the button to calibrate.
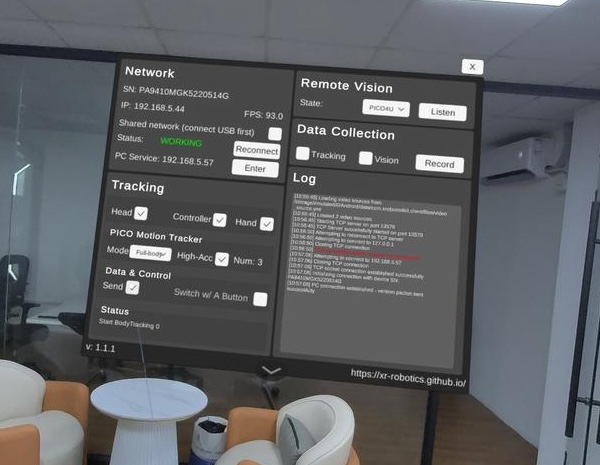
Settings
- Change
PC Serviceto the IP of the device running SONIC.
Deploying Sonic on Unitree G1
Prerequisites
Complete the following three steps before deploying for the first time. See the appendix at the end of this page for detailed instructions:
Download ioenv
git clone https://github.com/ioai-tech/ioenv_cli.git
- Load environment variables
echo 'source <path_to_ioenv_cli>/ioenv_cli/ioenv.sh' >> ~/.bashrc # Replace <path_to_ioenv_cli> with the local path to ioenv_cli
source ~/.bashrc
- List available images with
ioenv list
ioenv list

ENVIRONMENT          IMAGE      CONTAINER    STATUS
-----------          -----      ---------    ------
isaaclab             yes        --           --
mujocosim            --         --           --
onboard              --         --           --
sonic_onboard        --         --           --
sonic_sim            --         --           --
sonic_train          yes        yes          running
- Pull an image with
ioenv pull <ENVIRONMENT>
ioenv pull sonic_onboard

# Mirror download for users in regions with limited Docker Hub access
ioenv pull sonic_onboard --from-mirror
Running
# First terminal
ioenv run sonic_onboard

cd gear_sonic_deploy
source scripts/setup_env.sh
./deploy.sh real --input-type zmq_manager
# Second terminal
ioenv run sonic_onboard

source .venv_teleop/bin/activate
python gear_sonic/scripts/pico_manager_thread_server.py --manager
Training Sonic on a PC
- The example commands train on an RTX 3090
- Our actual training runs use 8x RTX PRO 6000 GPUs
Install Dependencies
- Install
DockerTutorial
You need to add your user to the docker group.
sudo usermod -aG docker $USER # Reboot required after running this
- Install
NVIDIA Container ToolkitTutorial
Download ioenv
git clone https://github.com/ioai-tech/ioenv_cli.git
- Load environment variables
echo 'source <path_to_ioenv_cli>/ioenv_cli/ioenv.sh' >> ~/.bashrc # Replace <path_to_ioenv_cli> with the local path to ioenv_cli
source ~/.bashrc
- List available images with
ioenv list
ioenv list

ENVIRONMENT          IMAGE      CONTAINER    STATUS
-----------          -----      ---------    ------
isaaclab             yes        --           --
mujocosim            --         --           --
onboard              --         --           --
sonic_onboard        --         --           --
sonic_sim            --         --           --
sonic_train          yes        yes          running
- Pull an image with
ioenv pull <ENVIRONMENT>
ioenv pull sonic_train

# Mirror download for users in regions with limited Docker Hub access
ioenv pull sonic_train --from-mirror
Data Preparation
- GPU: NVIDIA GPU (L40 recommended)
- CUDA: CUDA 12.x
- Enter the
sonic_trainenvironment
ioenv run sonic_train
- Optional: create symlinks under the mounted directory so data is not lost when the container restarts
mkdir -p /root/workspace/data
ln -s /root/workspace/data /opt/GR00T-WholeBodyControl/data

mkdir -p /root/workspace/sonic_release
ln -s /root/workspace/sonic_release /opt/GR00T-WholeBodyControl/sonic_release
- Download model
checkpointsandSMPL motion datafrom Hugging Face
cd /opt/GR00T-WholeBodyControl/

## A proxy is required here
export https_proxy=http://127.0.0.1:7897/
export http_proxy=http://127.0.0.1:7897/

python download_from_hf.py --training
-
Download the BONES-SEED dataset
-
Log in to Hugging Face, click your avatar in the top-right corner →
Access Tokens, generate atoken, and grant it the permissionRead access to contents of all public gated repos you can access. -
Fill out the form on the
bones-seedHugging Face page to gain download access: https://huggingface.co/datasets/bones-studio/seed
## Proxy required
export https_proxy=http://127.0.0.1:7897/
export http_proxy=http://127.0.0.1:7897/

# Login first
huggingface-cli login

## Download all files in bones-seed
huggingface-cli download bones-studio/seed --repo-type dataset --local-dir ./data/bones-seed

## We only need g1.tar.gz
export HF_HUB_ENABLE_HF_TRANSFER=1
huggingface-cli download bones-studio/seed g1.tar.gz --repo-type dataset --local-dir ./data/bones-seed

## Extract
tar -xzf data/bones-seed/g1.tar.gz -C data/bones-seed/g1
- Convert the motion data
SONIC expects motion data in motion_lib PKL format. This step converts the Bones-SEED CSV files to PKL.
cd /opt/GR00T-WholeBodyControl/

python gear_sonic/data_process/convert_soma_csv_to_motion_lib.py \
    --input data/bones-seed/g1/csv/ \
    --output data/motion_lib_bones_seed/robot \
    --fps 30 \
    --fps_source 120 \
    --individual \
    --num_workers 16
- Filter the data
Remove motions the G1 robot cannot perform (interactions with furniture, vehicles, stunt motions, raised platforms / elevated surfaces).
cd /opt/GR00T-WholeBodyControl/

python gear_sonic/data_process/filter_and_copy_bones_data.py \
    --source data/motion_lib_bones_seed/robot \
    --dest data/motion_lib_bones_seed/robot_filtered \
    --workers 16
File Structure
/opt/GR00T-WholeBodyControl/
├── data/motion_lib_bones_seed/
│   ├── robot/              # Full motion library (142K PKLs)
│   └── robot_filtered/     # Filtered subset (~130K PKLs)
└── gear_sonic/
Training
- Before starting training, validate the full pipeline with
sample_data
# Download sample data
python download_from_hf.py --sample

python gear_sonic/train_agent_trl.py \
    +exp=manager/universal_token/all_modes/sonic_release \
    num_envs=16 headless=True \
    ++manager_env.commands.motion.motion_lib_cfg.motion_file=sample_data/robot_filtered \
    ++manager_env.commands.motion.motion_lib_cfg.smpl_motion_file=sample_data/smpl_filtered
- Then train with the converted
BONES-SEEDdataset
python gear_sonic/train_agent_trl.py \
    +exp=manager/universal_token/all_modes/sonic_release \
    num_envs=4096 headless=True \
    ++manager_env.commands.motion.motion_lib_cfg.motion_file=data/motion_lib_bones_seed/robot_filtered \
    ++manager_env.commands.motion.motion_lib_cfg.smpl_motion_file=data/smpl_filtered
- Or fine-tune from a downloaded
checkpoint
python gear_sonic/train_agent_trl.py \
    +exp=manager/universal_token/all_modes/sonic_release \
    +checkpoint=sonic_release/last.pt \
    num_envs=4096 headless=True \
    ++manager_env.commands.motion.motion_lib_cfg.motion_file=data/motion_lib_bones_seed/robot_filtered \
    ++manager_env.commands.motion.motion_lib_cfg.smpl_motion_file=data/smpl_filtered
Training checkpoints are saved under /opt/GR00T-WholeBodyControl/logs_rl/TRL_G1_Track/manager/universal_token/all_modes/sonic_release_test-<timestamp>/.
Evaluating a Checkpoint
You can evaluate using either metrics or rendered videos.
# --- Metrics ---
python gear_sonic/eval_agent_trl.py \
    +checkpoint=<path_to_checkpoint.pt> \
    +headless=True \
    ++eval_callbacks=im_eval \
    ++run_eval_loop=False \
    ++num_envs=128 \
    "+manager_env/terminations=tracking/eval" \
    "++manager_env.commands.motion.motion_lib_cfg.max_unique_motions=512"
# --- Render videos ---
python gear_sonic/eval_agent_trl.py \
    +checkpoint=<path_to_checkpoint.pt> \
    +headless=True \
    ++eval_callbacks=im_eval \
    ++run_eval_loop=False \
    ++num_envs=8 \
    ++manager_env.config.render_results=True \
    "++manager_env.config.save_rendering_dir=/tmp/renders" \
    ++manager_env.config.env_spacing=10.0 \
    "~manager_env/recorders=empty" "+manager_env/recorders=render"
- If you cannot log in to
wandb, use local mode to view training curves
WANDB_MODE=offline python gear_sonic/train_agent_trl.py ...   # offline mode
    wandb.wandb_project=my_project wandb.wandb_entity=my_team  # custom project
    use_wandb=false                                             # disable entirely
Exporting an ONNX Model
python gear_sonic/eval_agent_trl.py \
    +checkpoint=<path_to_checkpoint.pt> \
    +headless=True ++num_envs=1 \
    +export_onnx_only=true
The exported ONNX models are placed under /opt/GR00T-WholeBodyControl/logs_rl/TRL_G1_Track/manager/universal_token/all_modes/sonic_release_test-<timestamp>/exported/. You'll need the model_step_<num_step>_encoder.onnx and model_step_<num_step>_decoder.onnx files from that directory.
Deploying a Model You Trained Yourself
As of 2026-05-21, deploying a self-trained ONNX file requires downloading g1_wrist_joints_10_clean.yaml, as noted by the author in this GitHub issue.
Deploying Your Model in Simulation
-
Make sure
ioenvis installed and thesonic_onboardimage has been pulled. -
Copy the
.onnxand.yamlfiles to the shared folder.
mkdir -p ~/ioenv_ws/sonic_sim_ws/sonic_patch
cp g1_wrist_joints_10_clean.yaml ~/ioenv_ws/sonic_sim_ws/sonic_patch
cp model_step_<num_step>_encoder.onnx ~/ioenv_ws/sonic_sim_ws/sonic_patch
cp model_step_<num_step>_decoder.onnx ~/ioenv_ws/sonic_sim_ws/sonic_patch
- Run
# First terminal
ioenv run sonic_sim

cd /opt/GR00T-WholeBodyControl
source .venv_teleop/bin/activate
python gear_sonic/scripts/run_sim_loop.py
# Second terminal
ioenv run sonic_sim

## Run with your own trained model
just run g1_deploy_onnx_ref lo model_step_<num_step>_decoder.onnx reference/example/ \  --obs-config /root/workspace/sonic_patch/g1_wrist_joints_10_clean.yaml \  --encoder-file /root/workspace/sonic_patch/model_step_<num_step>_encoder.onnx \  --planner-file planner/target_vel/V2/planner_sonic.onnx \  --input-type manager \  --enable-motion-recording \  --enable-csv-logs \  --disable-crc-check
# Third terminal
ioenv run sonic_sim

cd /opt/GR00T-WholeBodyControl
source .venv_teleop/bin/activate
python gear_sonic/scripts/pico_manager_thread_server.py --manager
Deploying Your Model on the Unitree G1
-
Make sure
ioenvis installed and thesonic_onboardimage has been pulled. -
Copy the
.onnxand.yamlfiles to the shared folder.
mkdir -p ~/ioenv_ws/sonic_onboard_ws/sonic_patch
cp g1_wrist_joints_10_clean.yaml ~/ioenv_ws/sonic_sim_ws/sonic_patch
cp model_step_<num_step>_encoder.onnx ~/ioenv_ws/sonic_sim_ws/sonic_patch
cp model_step_<num_step>_decoder.onnx ~/ioenv_ws/sonic_sim_ws/sonic_patch
- Run
# First terminal
ioenv run sonic_onboard

# Run with your own trained model
just run g1_deploy_onnx_ref enP8p1s0 /root/workspace/sonic_patch/model_step_<num_step>_decoder.onnx reference/example/ \  --obs-config /root/workspace/sonic_patch/g1_wrist_joints_10_clean.yaml \  --encoder-file /root/workspace/sonic_patch/model_step_<num_step>_encoder.onnx \  --planner-file planner/target_vel/V2/planner_sonic.onnx \  --input-type zmq_manager \  --enable-motion-recording \  --enable-csv-logs
# Second terminal
ioenv run sonic_onboard

source .venv_teleop/bin/activate
python gear_sonic/scripts/pico_manager_thread_server.py --manager
Appendix
Tools
-
An Ubuntu 22.04 laptop
-
An external drive enclosure, an SSD (256 GB or larger), and a data cable
-
Unitree G1
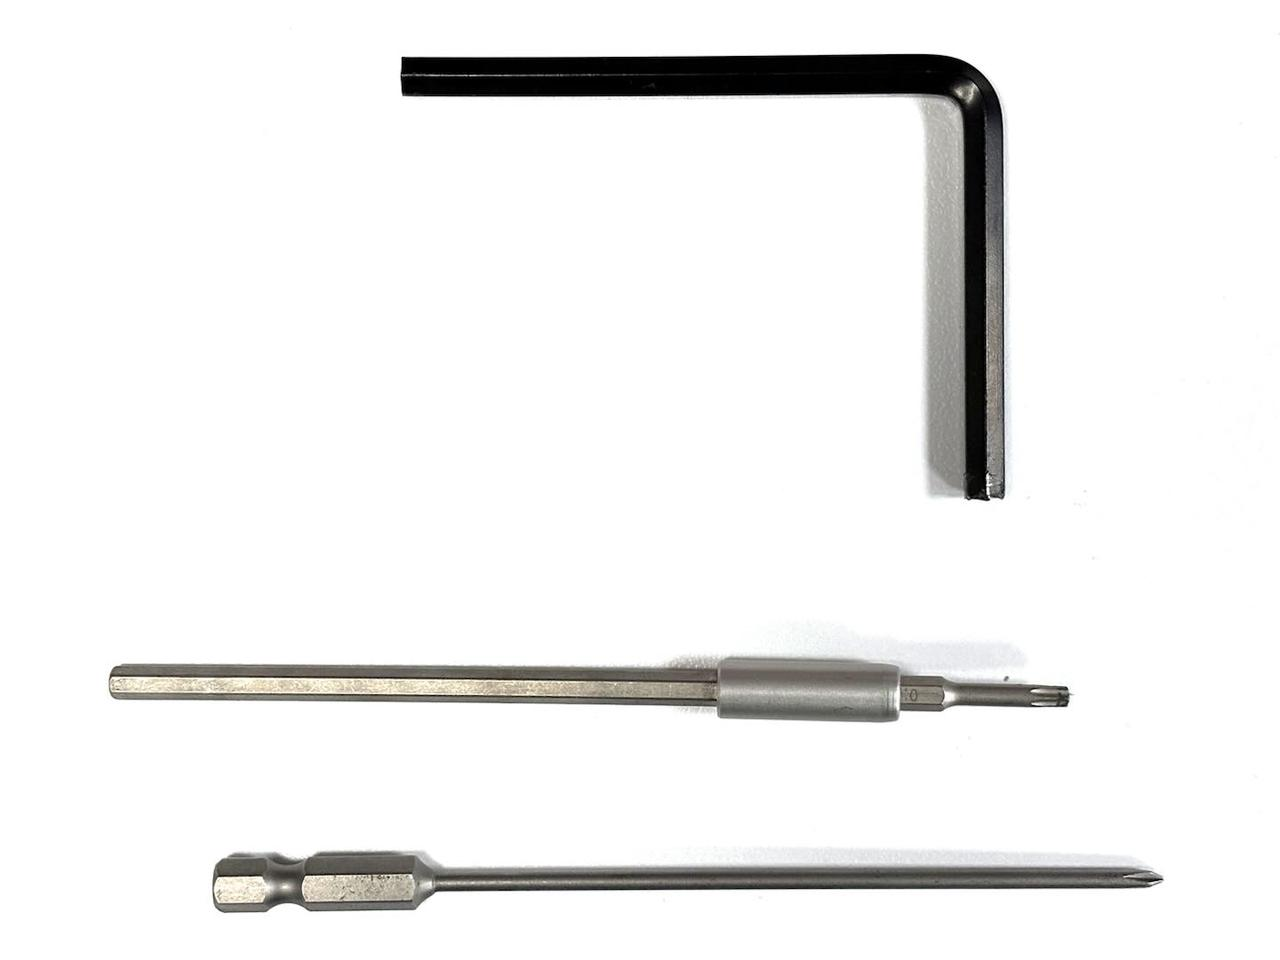
-
Tools (top to bottom): hex wrench, Torx (hex star) screwdriver, Phillips screwdriver
Flashing the SSD and Robot Firmware
Flash the Jetson Image to the SSD
-
Insert the SSD into the enclosure and connect it to your laptop.
-
Unmount the SSD.
sudo umount /dev/sda* -
Format the SSD as ext4.
sudo mkfs -t ext4 /dev/sda -
Download the Unitree G1 Jetson 6.2 image
g1-nx-j6.2.img.bz2from this link and flash it to the SSD. About 250 GB of data will be written.bzip2 -dc g1-nx-j6.2.img.bz2 | sudo dd of=/dev/sda bs=4M status=progress conv=fsync -
Eject the SSD when done.
sudo sync
sudo udisksctl power-off -b /dev/sda
Remove the SSD from the Unitree G1
- Use the hex wrench to remove the screws around the rear handle.
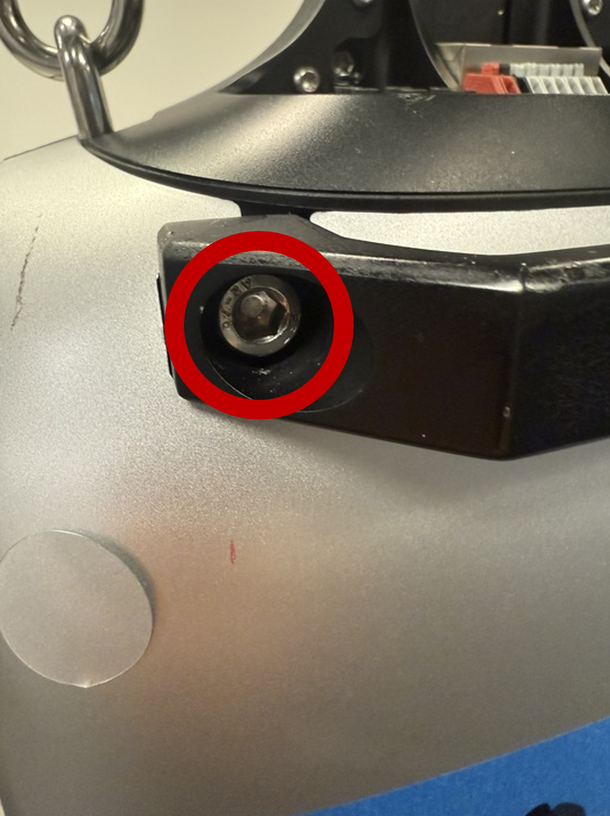
- Pry off the silver back cover.
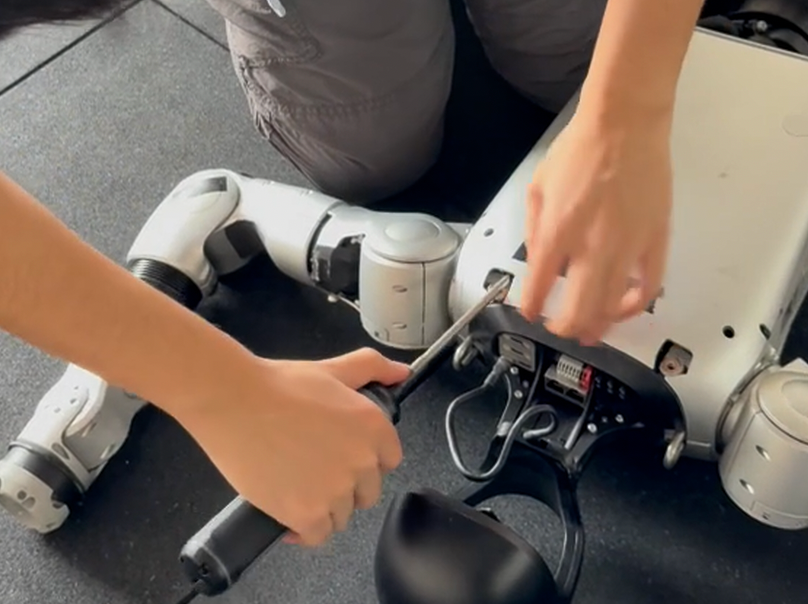
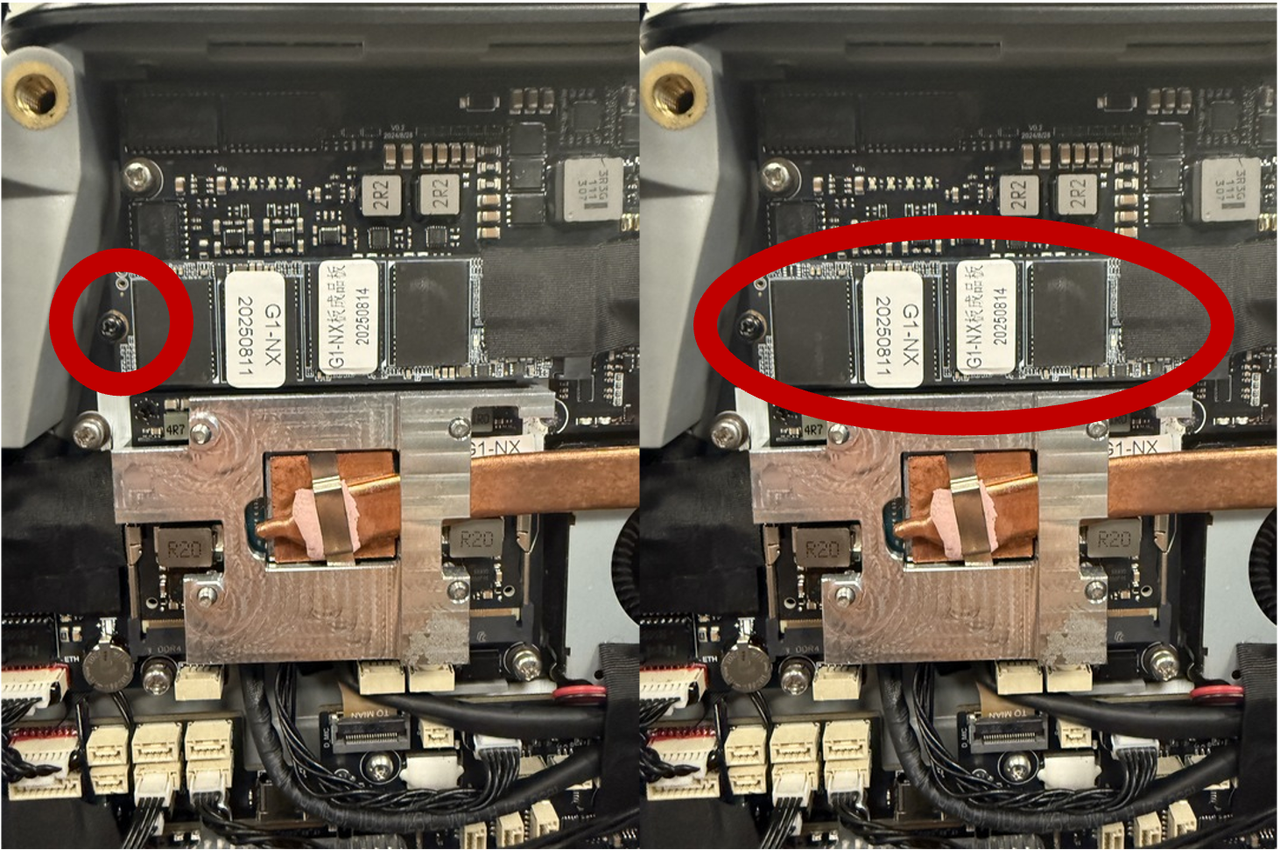
- Use the Torx screwdriver to remove the screws inside the red circles.
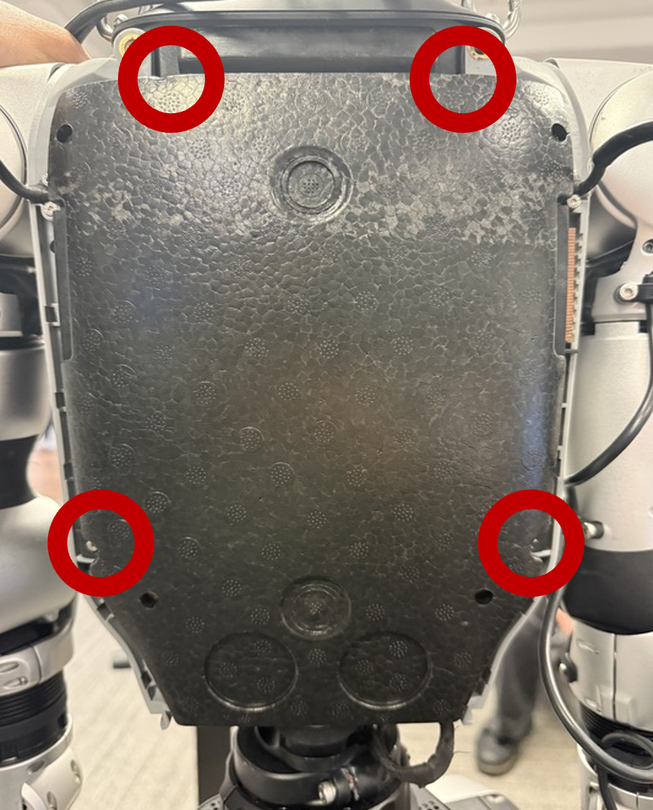
- Peel off the inner black plastic back cover.
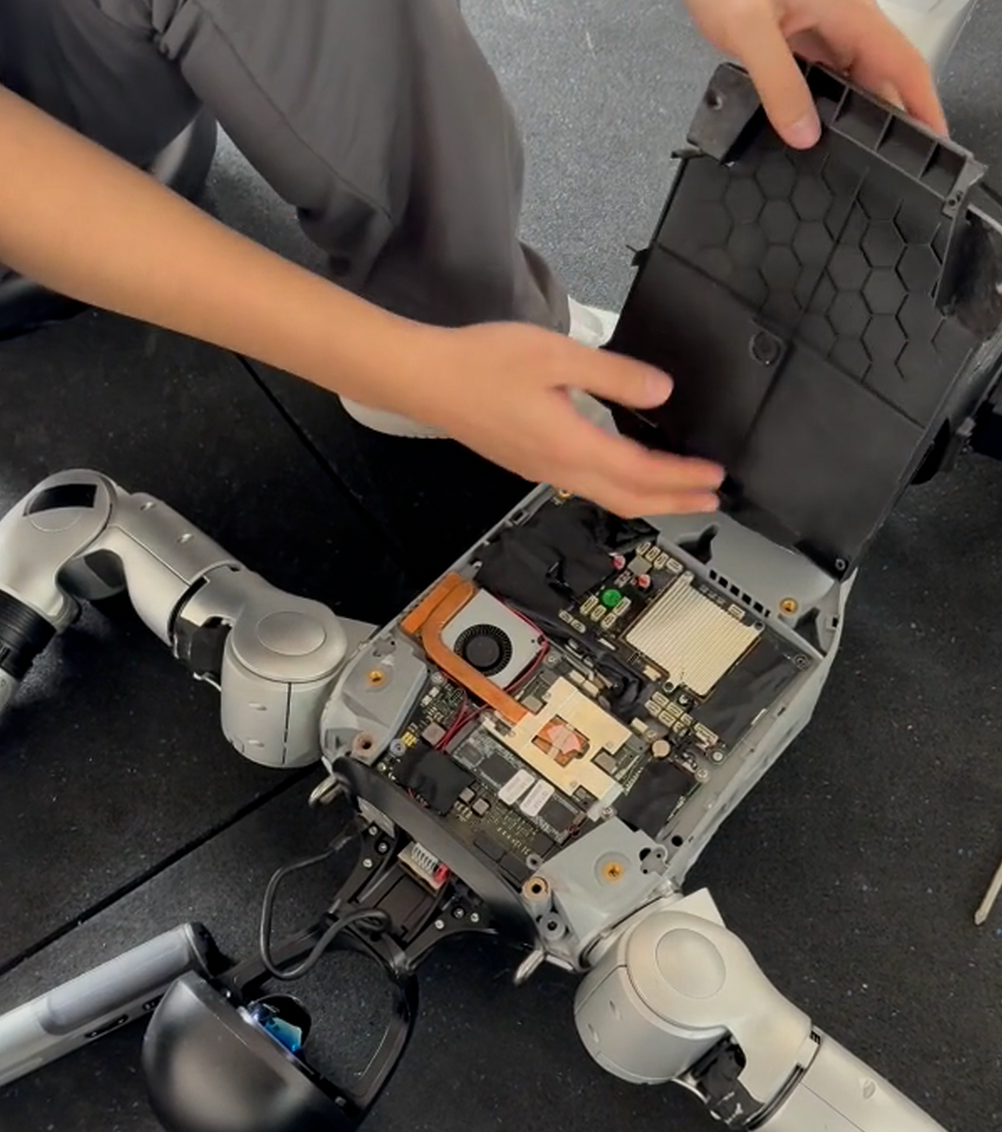
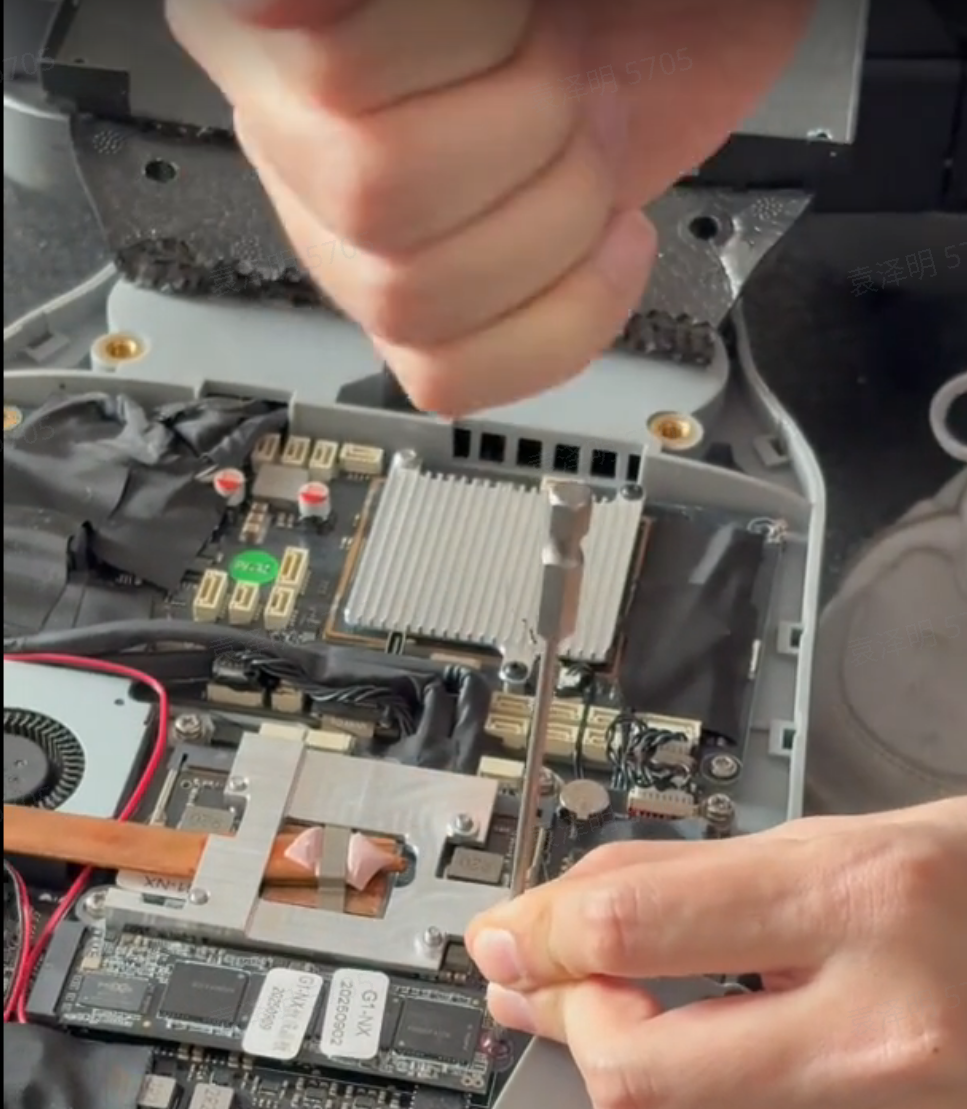
- Use the Phillips screwdriver to unscrew the screws securing the SSD.
The first time you remove the SSD screws, sealing adhesive is present. Align a smaller screwdriver with the screw and tap on top of the screwdriver with a hard object to break the seal.
Flash Jetpack 6.2 Firmware on the Unitree G1
-
Press the power button briefly, then press and hold it to power on the G1. Wait until all three power indicators are steadily lit.
-
Connect the robot to your laptop with a USB-C cable.
-
Press and hold the two white buttons to the right of the green LED simultaneously for 2 seconds.
-
While continuing to hold them, release the top white button (PWR) and keep holding the bottom button (REC) for another 2 seconds, until three green LEDs become two.

-
When only two LEDs are lit, the robot is in flashing mode. Open a new terminal on your computer and run
lsusb. You should see an entry containingNVIDIA Corp. APX.lsusb -
Download
Jetpack_6.2_nx.tar.bz2from this link and run the following commands to flash the Jetson Orin NX Jetpack 6.2 firmware (about 8 minutes).sudo tar -xjvf Jetpack_6.2_nx.tar.bz2
cd Jetpack_6.2_nx/Linux_for_Tegra
sudo ./flash_nx_module.sh -
Once flashing is complete, reinstall the SSD and reattach the back covers.
System Configuration
Connect to the Unitree G1 over Wi-Fi
-
Connect the Unitree G1 to your laptop with an Ethernet cable.
-
SSH into the Unitree Orin NX development board. Wired interface address:
192.168.123.164, usernameunitree, password123.ssh unitree@192.168.123.164 # password 123 -
Enable Wi-Fi on the Unitree G1.
sudo nmtui
# Connect to Wi-Fi in the TUI -
Check the IP address of the Unitree G1 wireless interface.
ifconfig -
Once you have the wireless IP, you can disconnect the Ethernet cable and connect to the G1 over Wi-Fi.
ssh unitree@<WiFi-IP> # password 123
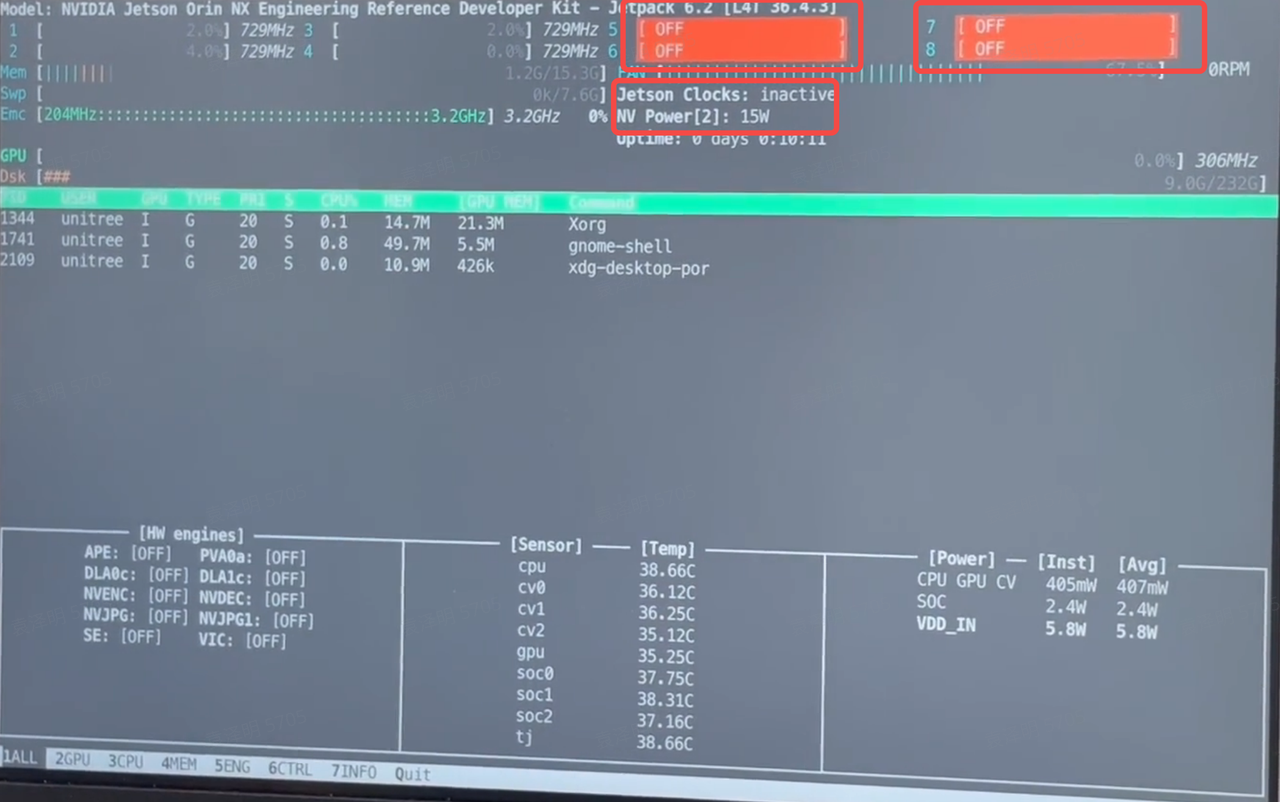
Enable High-Performance Mode on the Orin NX
On a freshly installed system, the Orin does not enable performance mode by default. When you check with jtop, CPU cores 5–8 are off, Jetson Clocks is inactive, and power is capped at 15W.
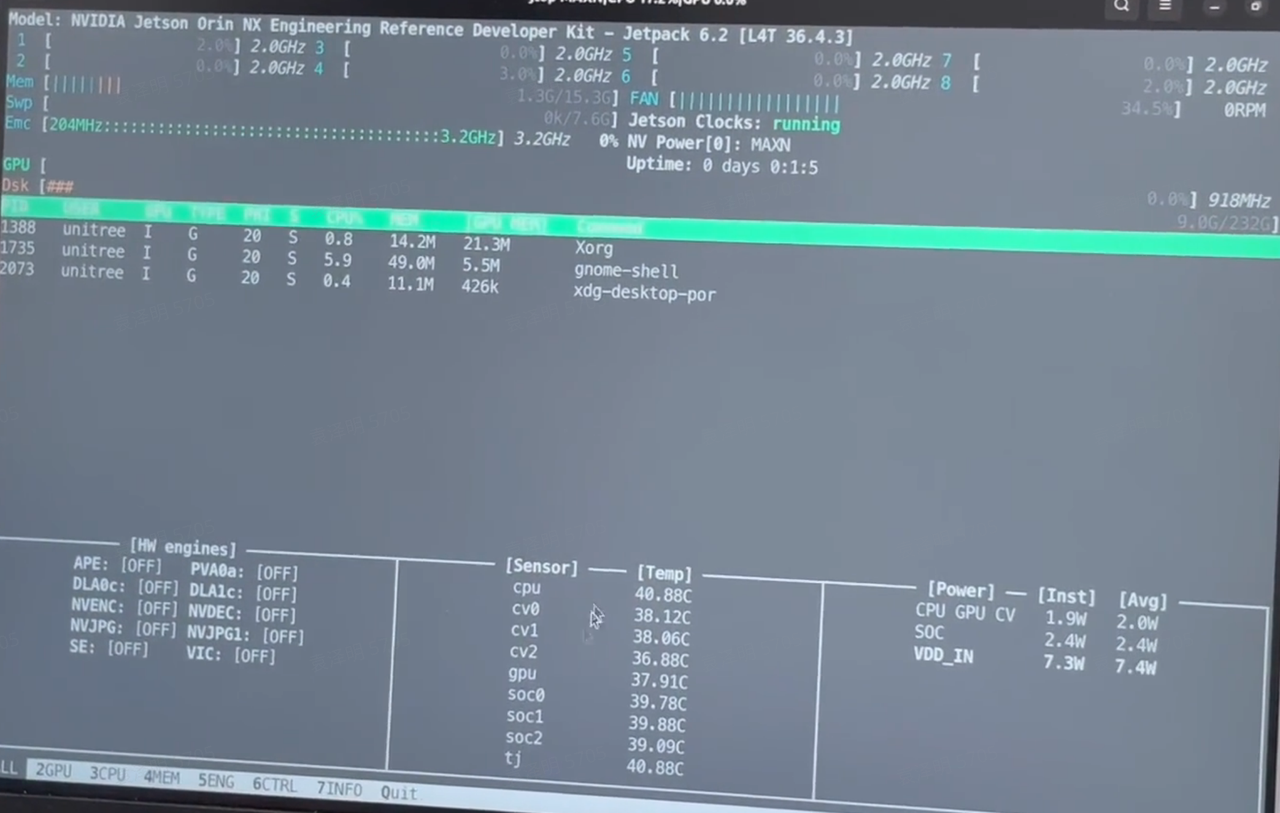
- Enable high-performance mode
sudo nvpmodel -m 0
sudo jetson_clocks
sudo jetson_clocks --show
Run jtop again to confirm that high-performance mode is now active.
Install Jetpack Libraries
In jtop, switch to the INFO page — the CUDA libraries are missing and need to be installed manually.
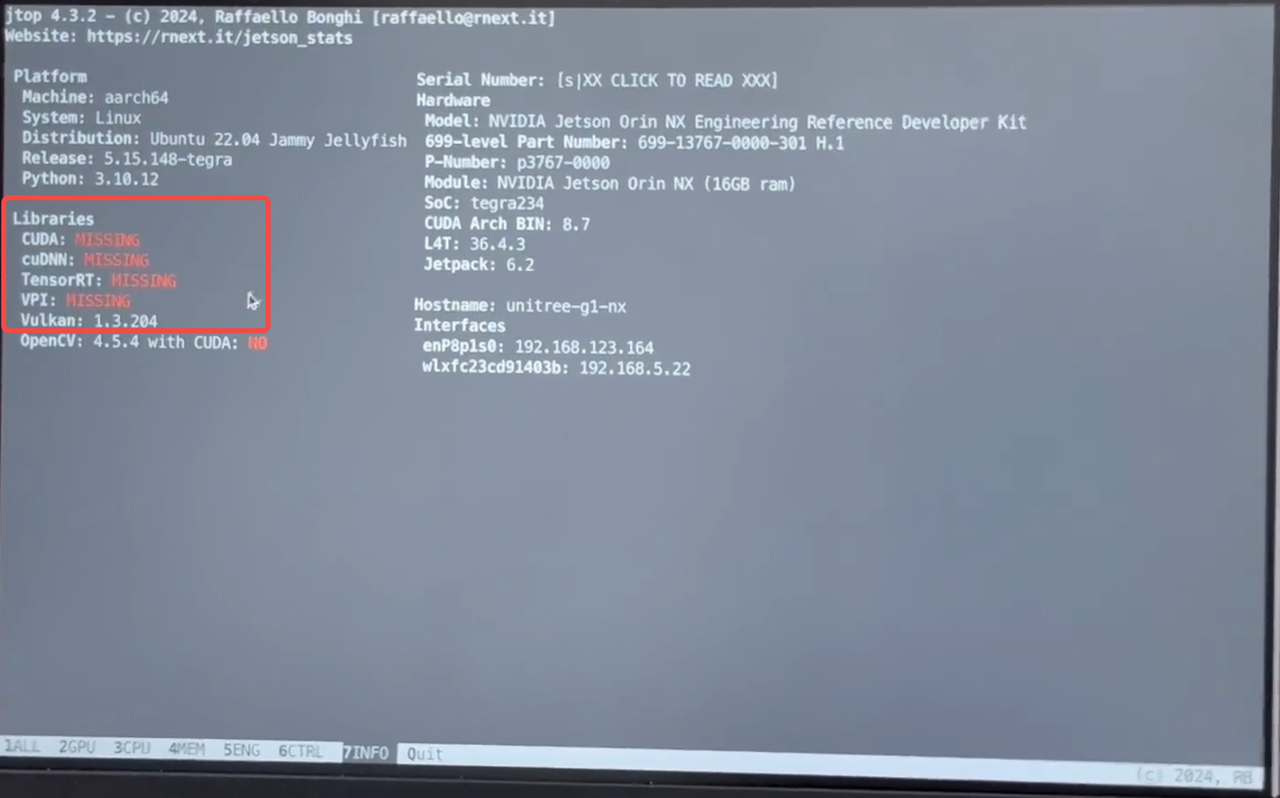
-
Install
jetpackviaaptsudo apt update
sudo apt install nvidia-jetpack
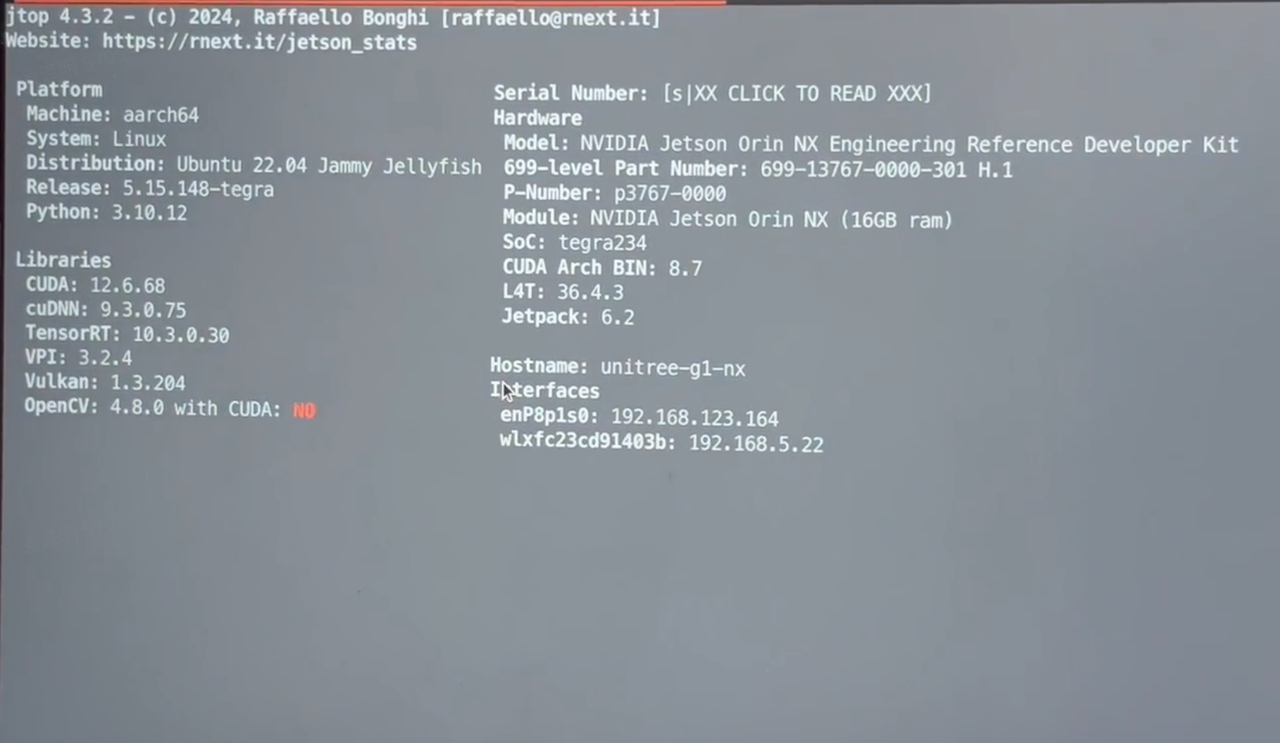
Once installed, you can check the library versions in jtop.
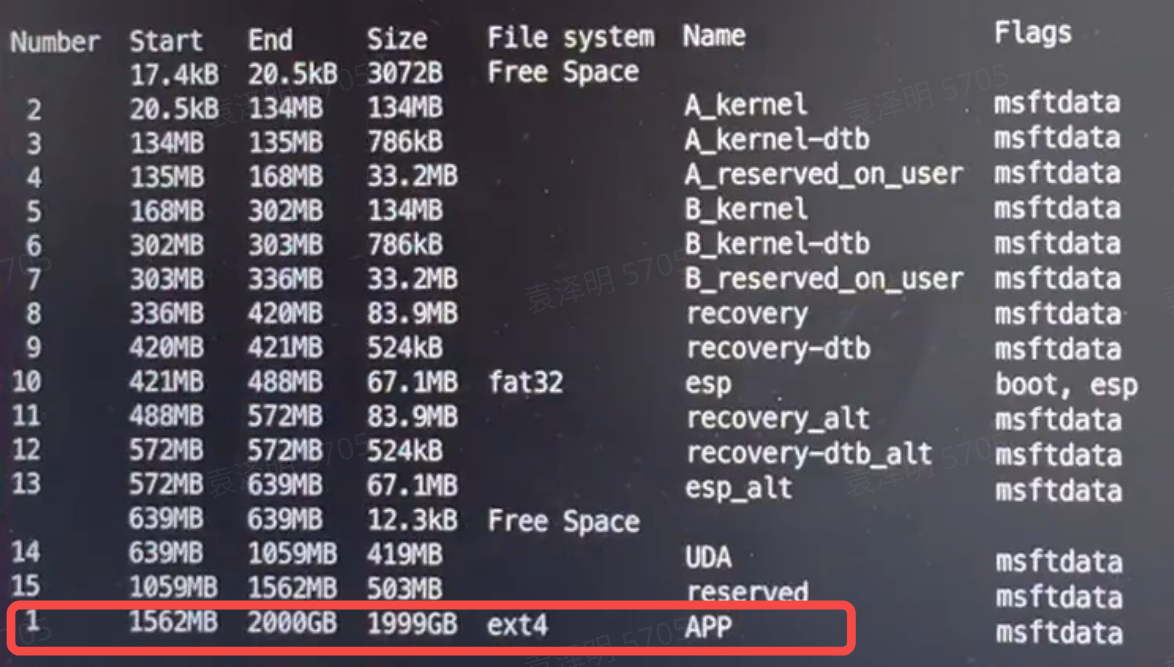
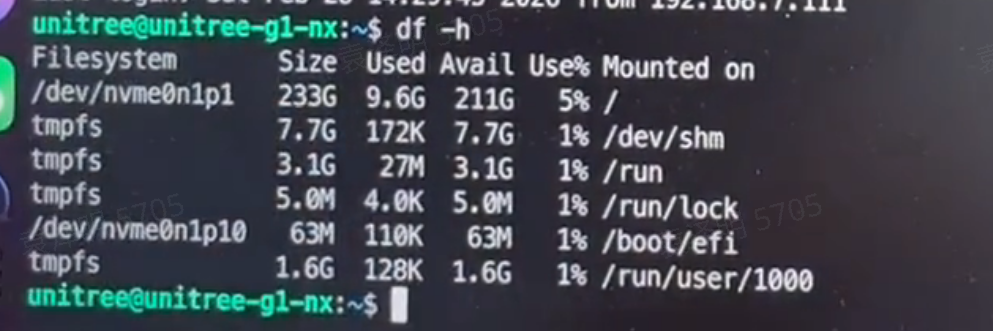
Expand the SSD Partition
After installation, df -h shows only 256 GB available, but the install was done on a 2 TB drive. Next, we'll expand the partition.
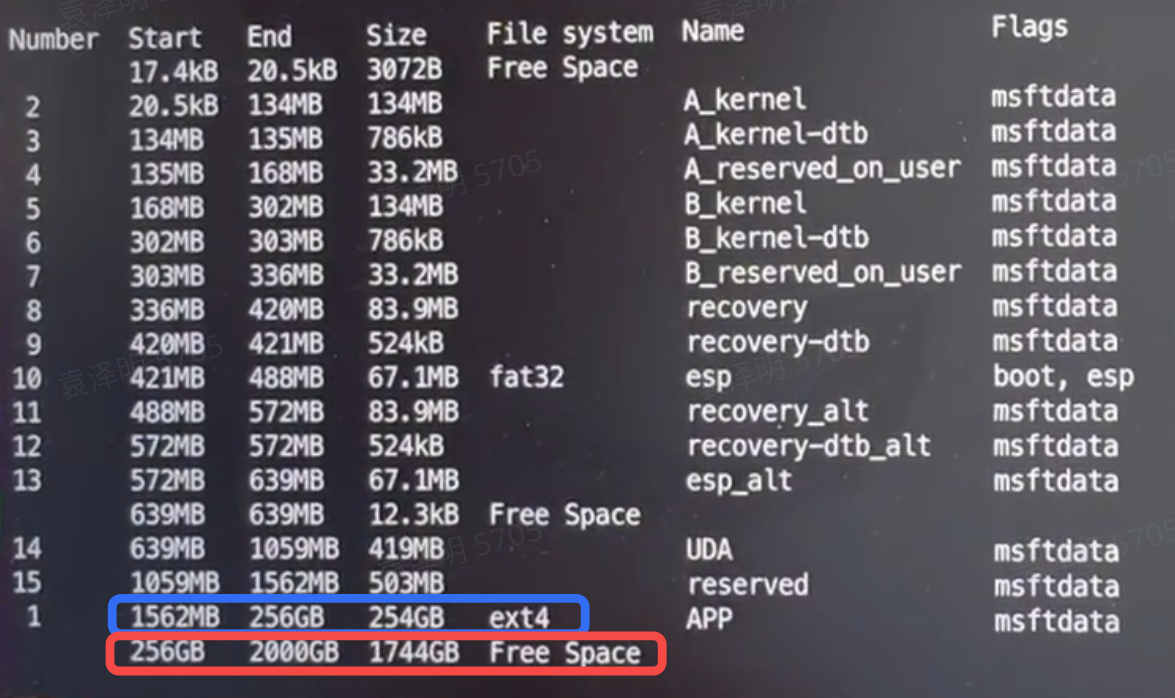
-
Check how much unused space the disk has.
sudo parted /dev/nvme0n1 print freeYou can see 254 GB used (blue box) and 1744 GB unused (red box).
-
Append the unused space to the
ext4partition.sudo parted /dev/nvme0n1
# Inside the parted CLI
resizepart 1 100%# Online resize
sudo resize2fs /dev/nvme0n1p1 -
Verify — the
ext4partition has been expanded to 2 TB.sudo parted /dev/nvme0n1 print free