Software Upgrade
TeleXperience software is continuously being iterated to continuously improve system stability and expand functionality, providing you with a richer and more reliable teleoperation experience. If you need to perform software updates, please contact your sales representative to obtain the software upgrade package and installation tools.
Device Access and Data Package Transfer
Login to Device
Connect to TeleSuit
# Password: 123456
ssh io@10.42.0.2
Connect to TeleBox
# Password: 123456
ssh orangepi@10.42.0.3
Copy Data Package
Transfer Files to TeleSuit
# Password: 123456
scp ${your_data_path} io@10.42.0.2:/home/io
Transfer Files to Telebox
# Password: 123456
scp ${your_data_path} orangepi@10.42.0.3:/home/orangepi
Update Installation Tool
Refer to Device Access and Data Package Transfer, copy the installation package to the target device.
Uninstall old version:
sudo dpkg -r io-dev-updator
Install new version (example):
sudo dpkg -i io_dev_updator_vx.x.x.deb
Software Package Update
Applicable software packages: io_teleop_v3, teleopbox_app, io_teleop_robot_descriptions and other components.
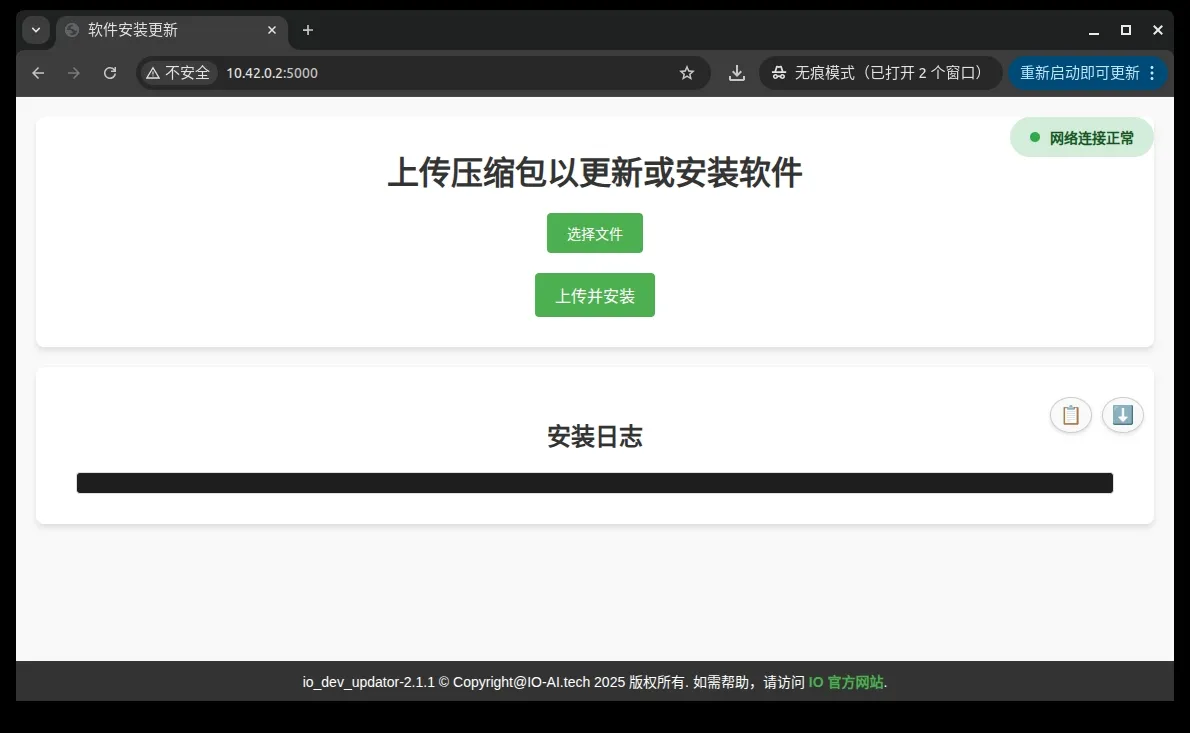
Access the installation tool web page io-dev-updator in a browser:
- Determine the access URL based on device IP address, for example: http://10.42.0.2:5000
- Click the Select File button on the page to specify the package to upload;
- Click Upload and Install to start the installation process.
Suit 2.0 Device Install Docker Software (Requires Internet)
Note: Do not install in stable mode
Connect to internet through telesuit router.
Update System Sources
sudo apt update
If update fails, execute the following commands to clean sources and update again:
sudo rm /etc/apt/sources.list.d/ros-latest.list
sudo rm -rf /var/lib/apt/lists/*
sudo apt clean
sudo curl -fsSL https://raw.githubusercontent.com/ros/rosdistro/master/ros.key | sudo gpg --dearmor -o /usr/share/keyrings/ros-archive-keyring.gpg
sudo apt update
Install Docker and Dependencies
sudo apt install -y docker.io pigz fuse-overlayfs
### Create docker group
sudo groupadd docker  # Add current user to docker group
sudo usermod -aG docker $USER
### Apply group changes (or re-login)
newgrp docker
Configure Docker daemon, create or edit /etc/docker/daemon.json:
sudo mkdir -p /etc/docker
sudo nano /etc/docker/daemon.json
Add the following configuration:
{
    "storage-driver": "fuse-overlayfs"
}
After saving, start Docker service:
sudo systemctl enable docker
sudo systemctl restart docker
Old TeleBox Install Dependencies Required for Docker Image Import
Online Installation
Connect to internet through telesuit router.
When using Docker version for the first time, please Connect to TeleBox and execute:
sudo apt install pv pigz -y
Offline Installation
Note: Please contact sales representative to obtain installation package.
Refer to Transfer Files to Telebox, copy the installation package to box, and install according to the following commands.
sudo dpkg -i pigz_2.6-1_arm64.deb
sudo dpkg -i pv_1.6.6-1build2_arm64.deb
Docker Image Import and Management
Debug Machine Environment Preparation
Note: Please do not update in telesuit's stable environment
Install Required Dependencies
sudo apt install pv pigz -y
Check Target Machine Remaining Storage Space
Refer to Login to Device, connect to target device and execute:
df -h
Please ensure the root directory (/) has at least 5GB of available space. If space is insufficient, you can free up space by cleaning old Docker images:
docker images # View docker image list
teleop-docker stop # Stop teleoperation service (if needed)
docker rmi <ImageID> # Delete specified image
Transfer and Load Docker Image
Execute on debug machine
time pv xxxxxxxx-image-xxxxxxxx.tar.gz | ssh ${user}@${ip} "pigz -dc - | docker load"
Recommended wait time:
- Wired connection: about 3–5 minutes
- Wireless connection: about 5–10 minutes
Telesuit
time pv io_teleop_v3-image-xxxxxxxx.tar.gz | ssh io@10.42.0.2 "pigz -dc - | docker load"
Telebox
time pv teleopbox_app_image-xxxxxxxx.tar.gz | ssh orangepi@10.42.0.3 "pigz -dc - | docker load"
Common Issues
Installation Failed, Insufficient Space
Refer to checking if there is sufficient remaining space in the target machine root directory for cleanup and retry.

Missing Dependencies
Refer to Old TeleBox Install Dependencies Required for Docker Image Import and install, then retry.

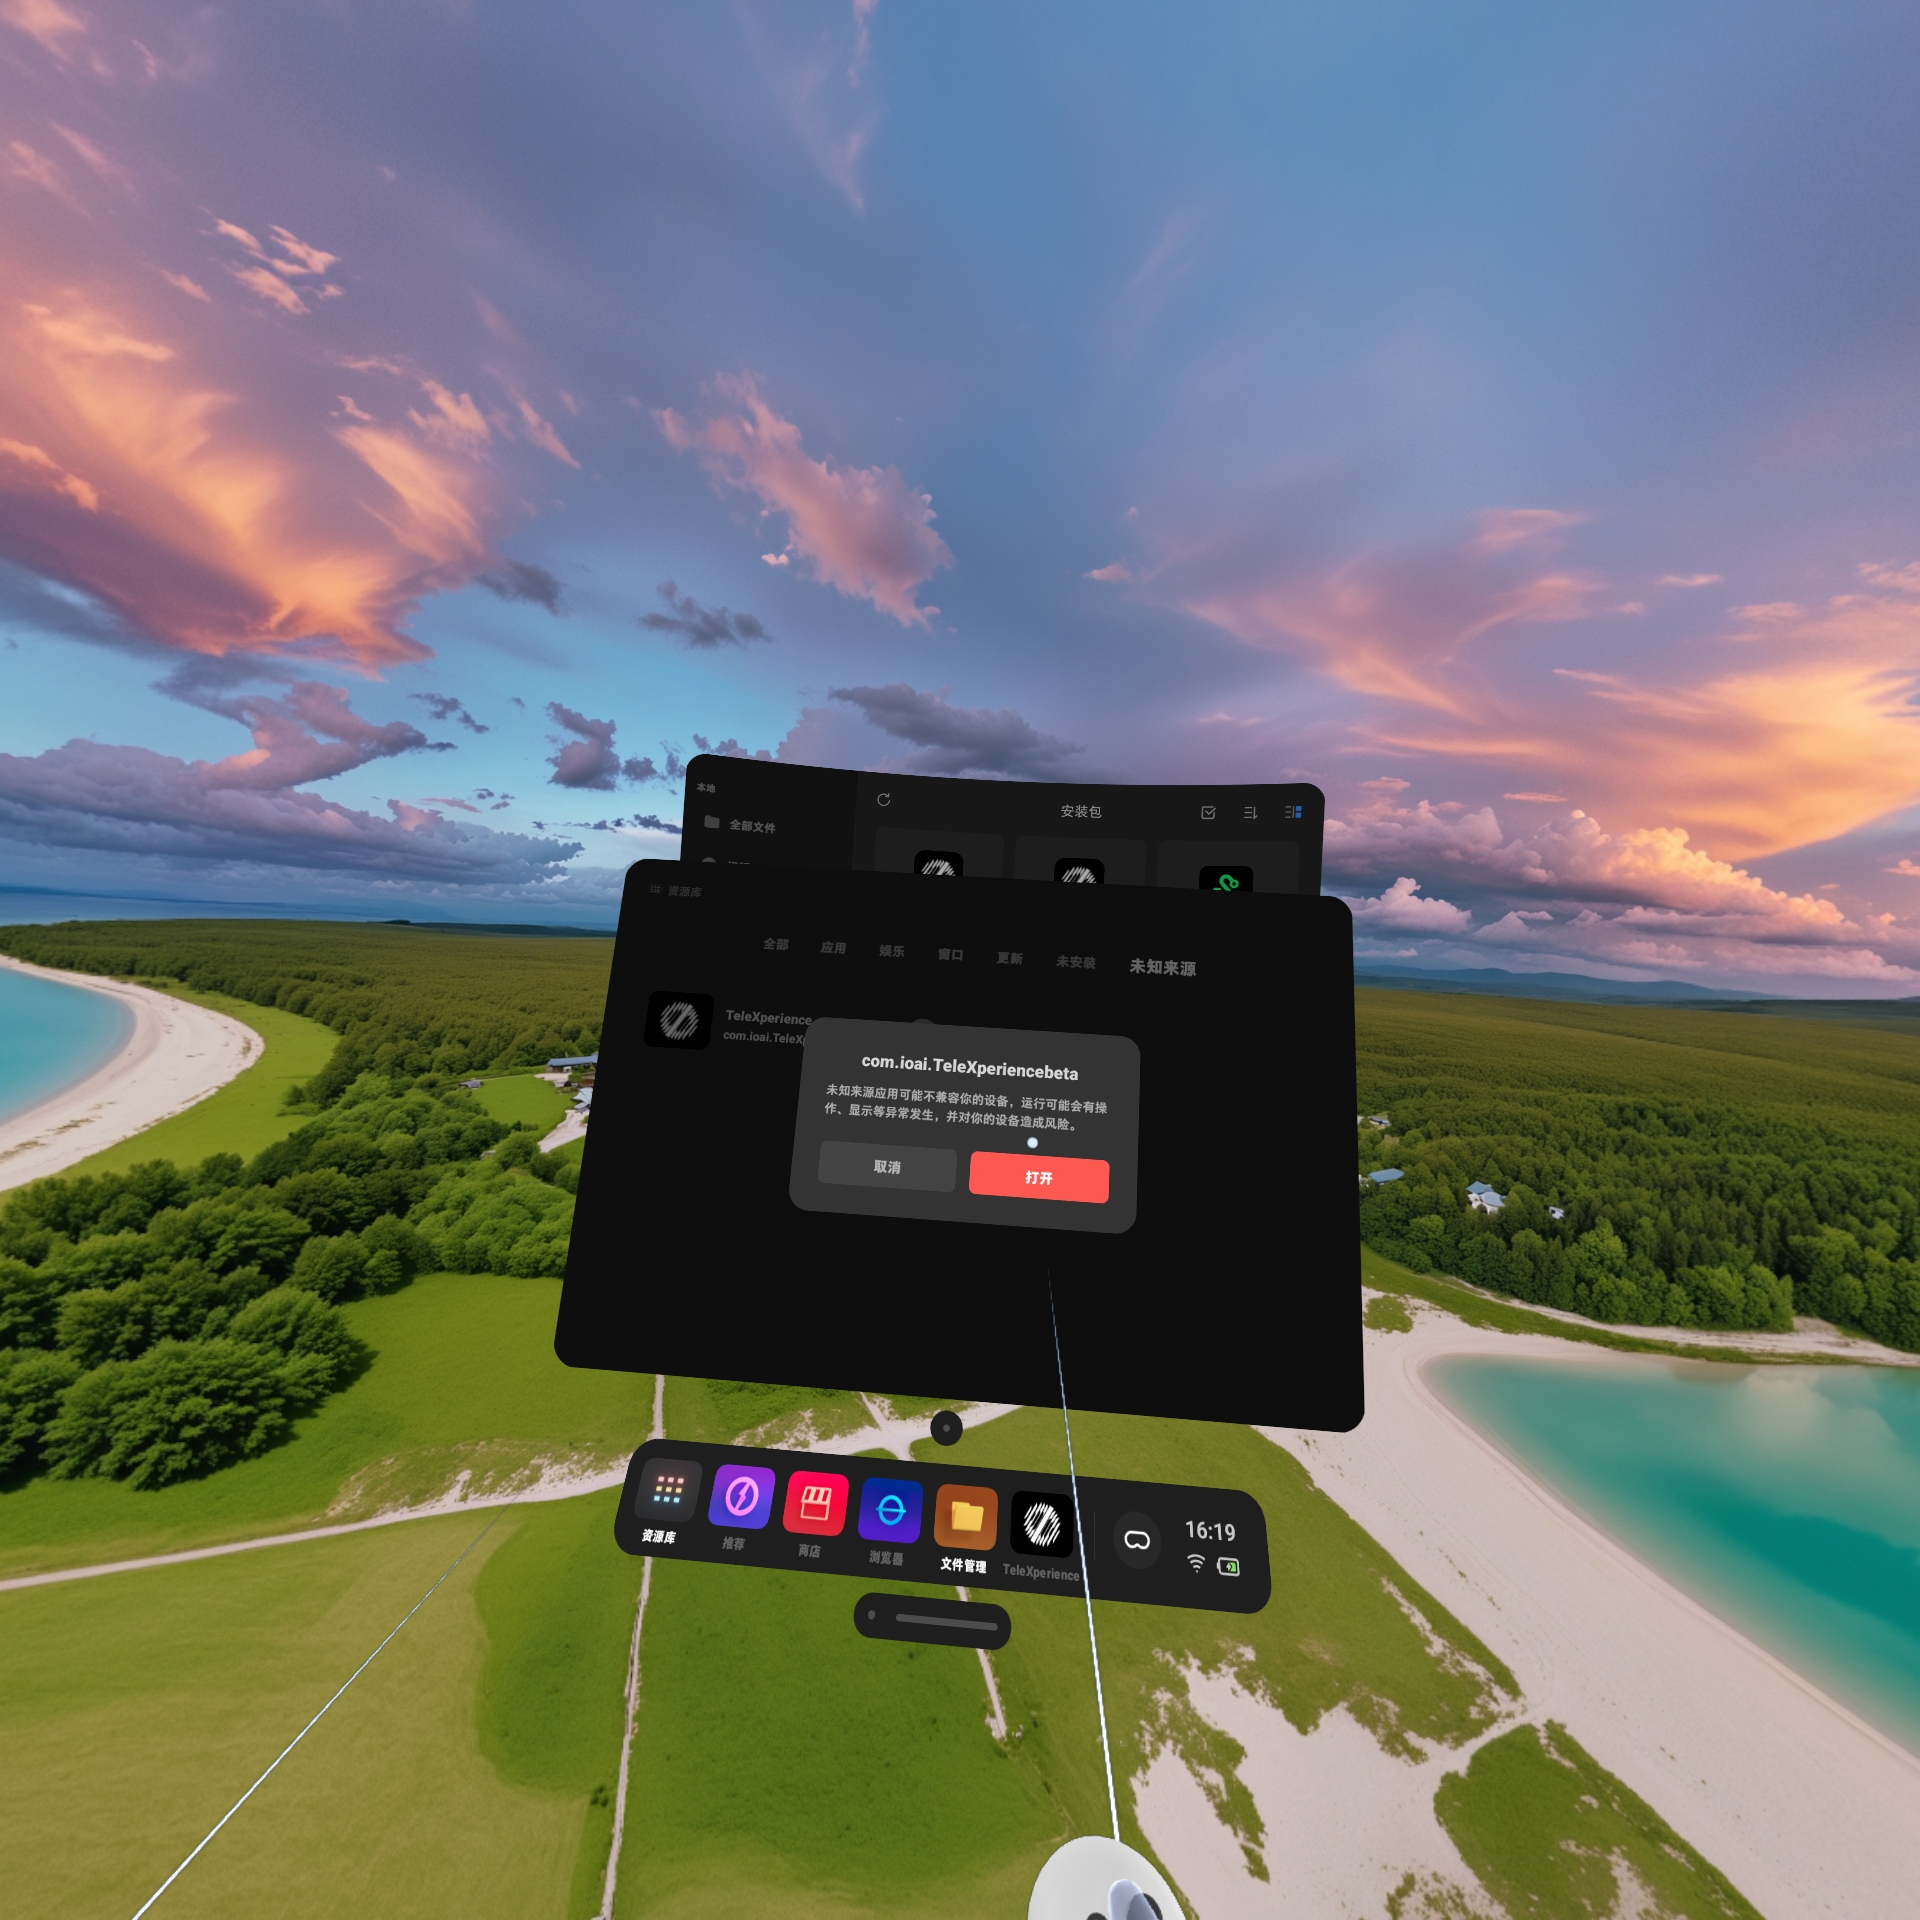
Update VR App
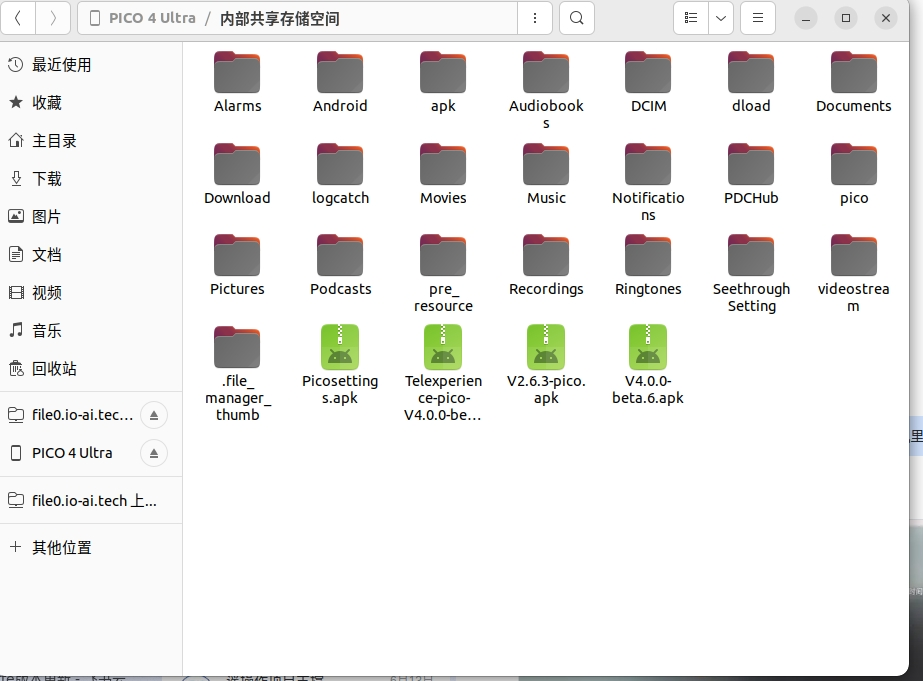
- Connect the VR to a computer, open the VR root directory, and place the APK file to be upgraded in the root directory.
- Open File Manager on the VR device.

- Select Packages in the sidebar, then click the APK file to install and select Install.

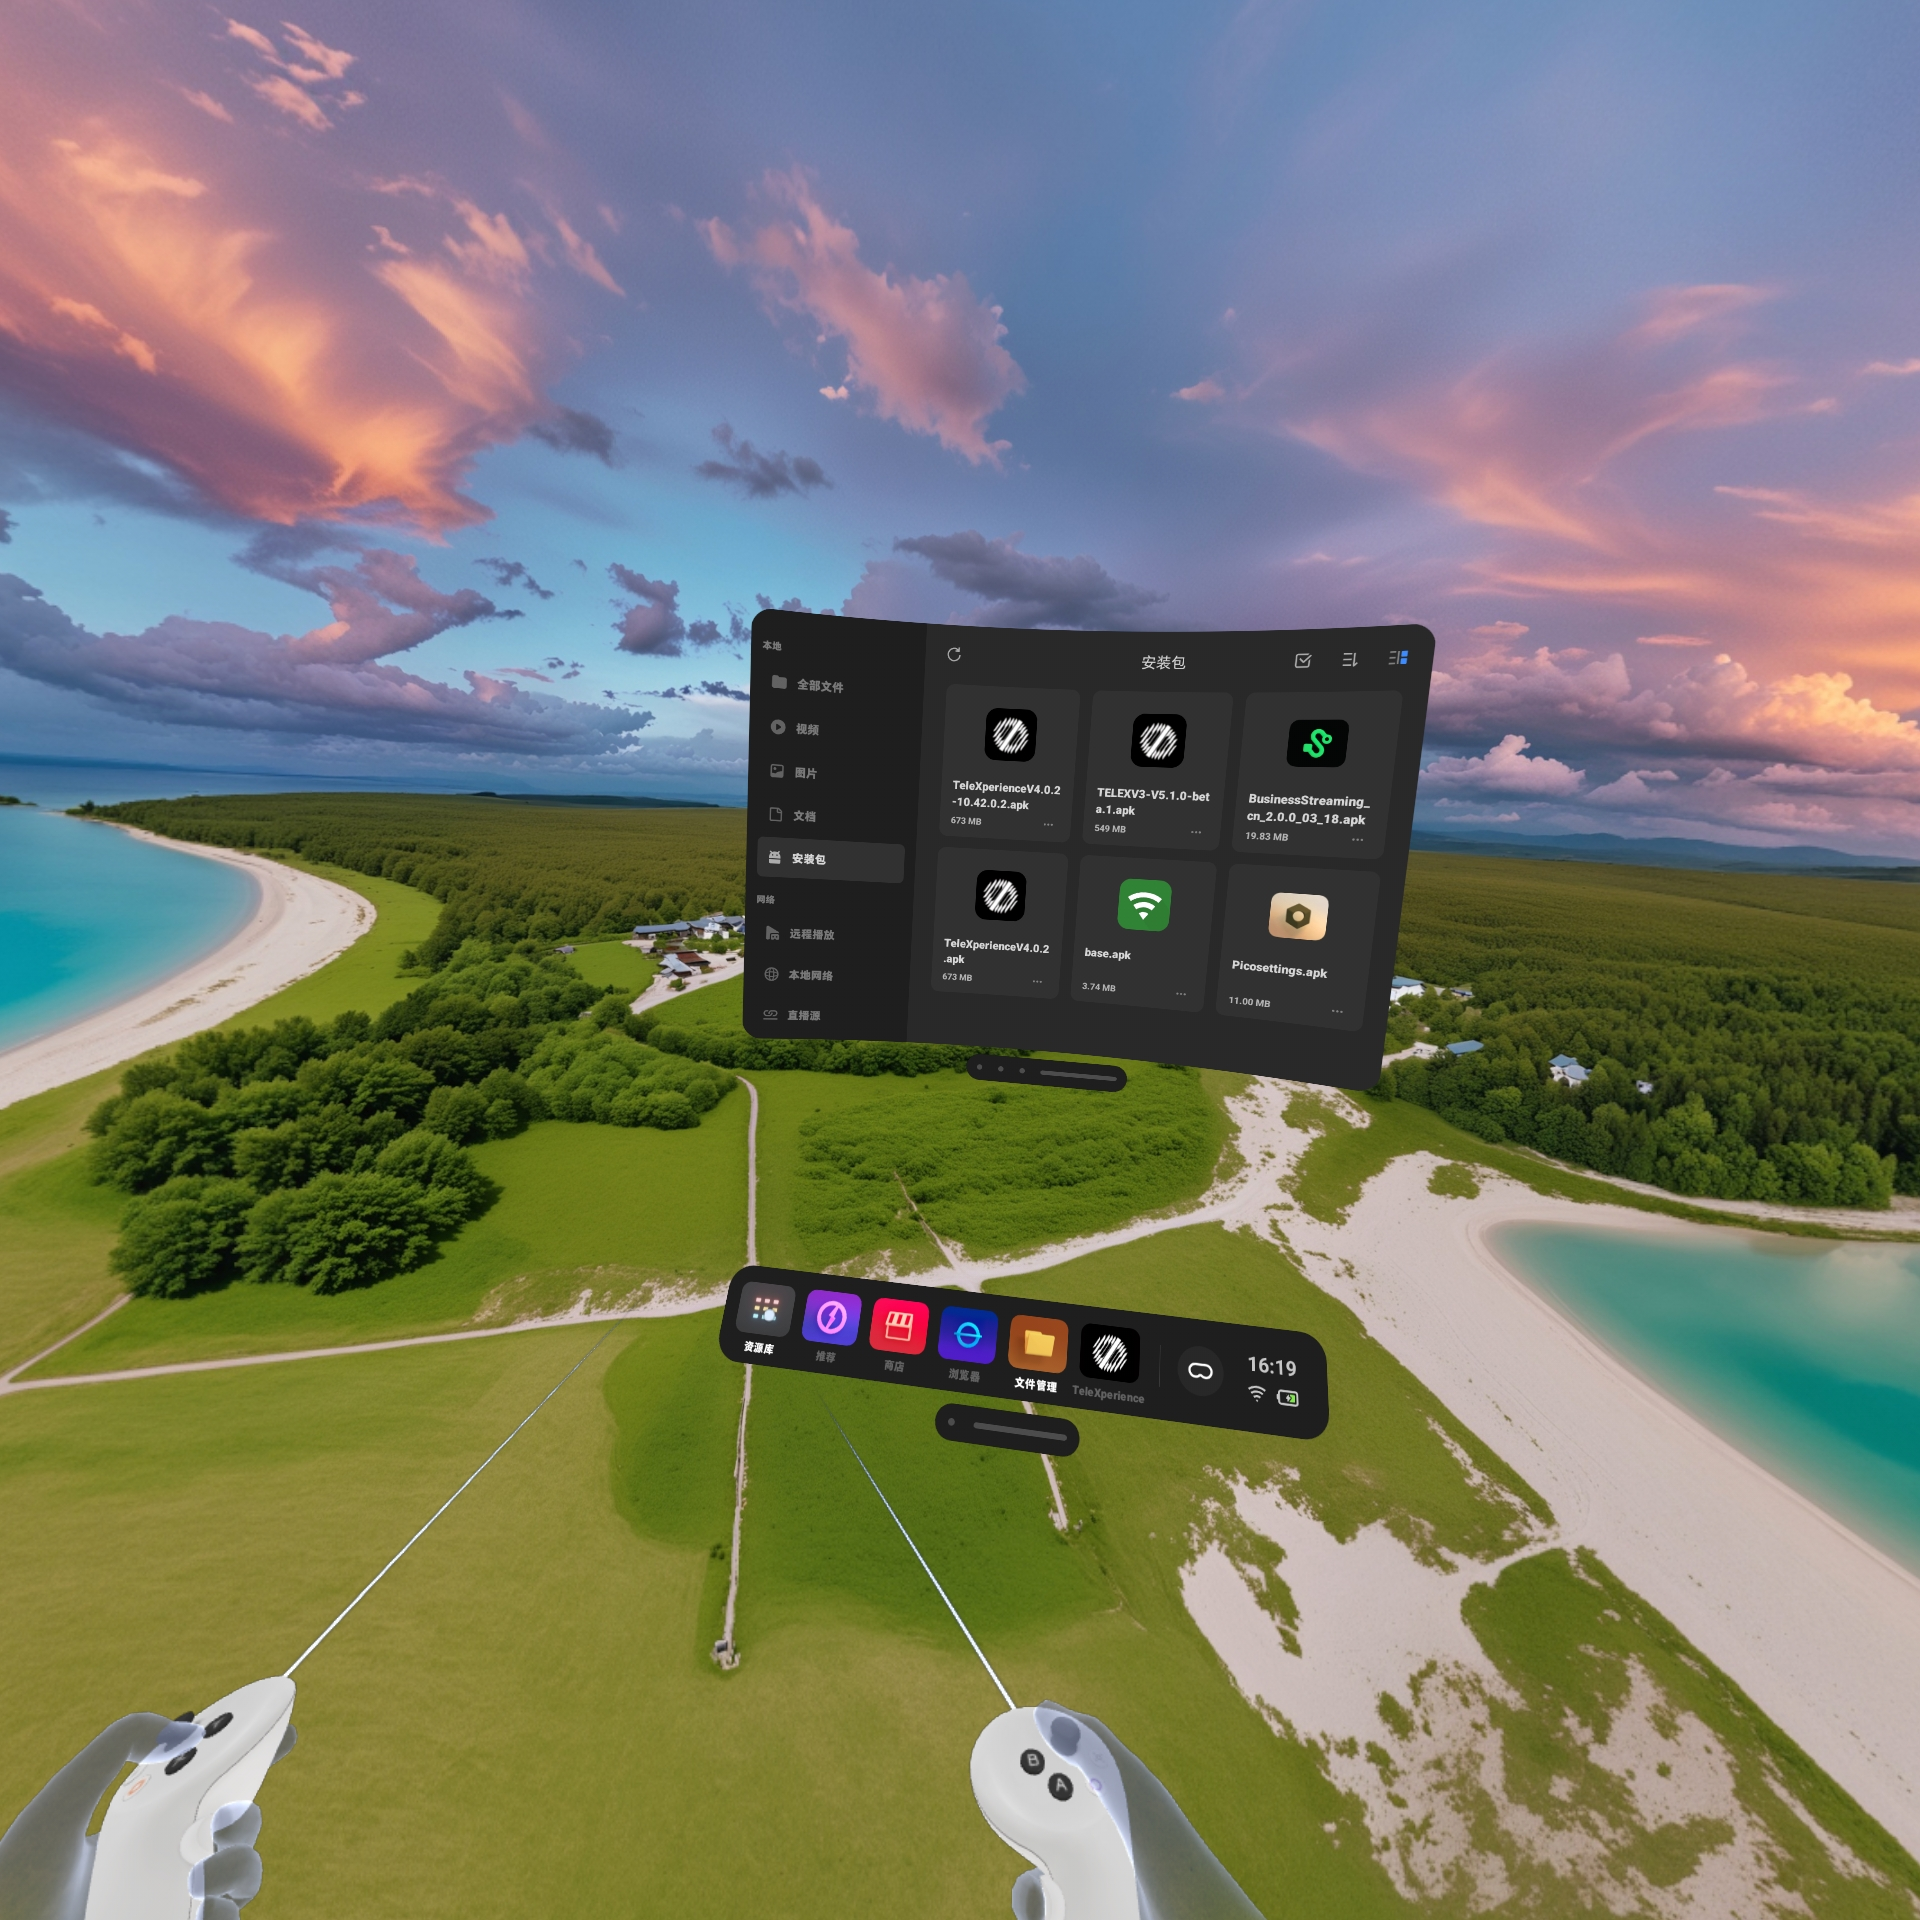

- After installation completes, click Done.
- Click Library, then click Unknown Sources.

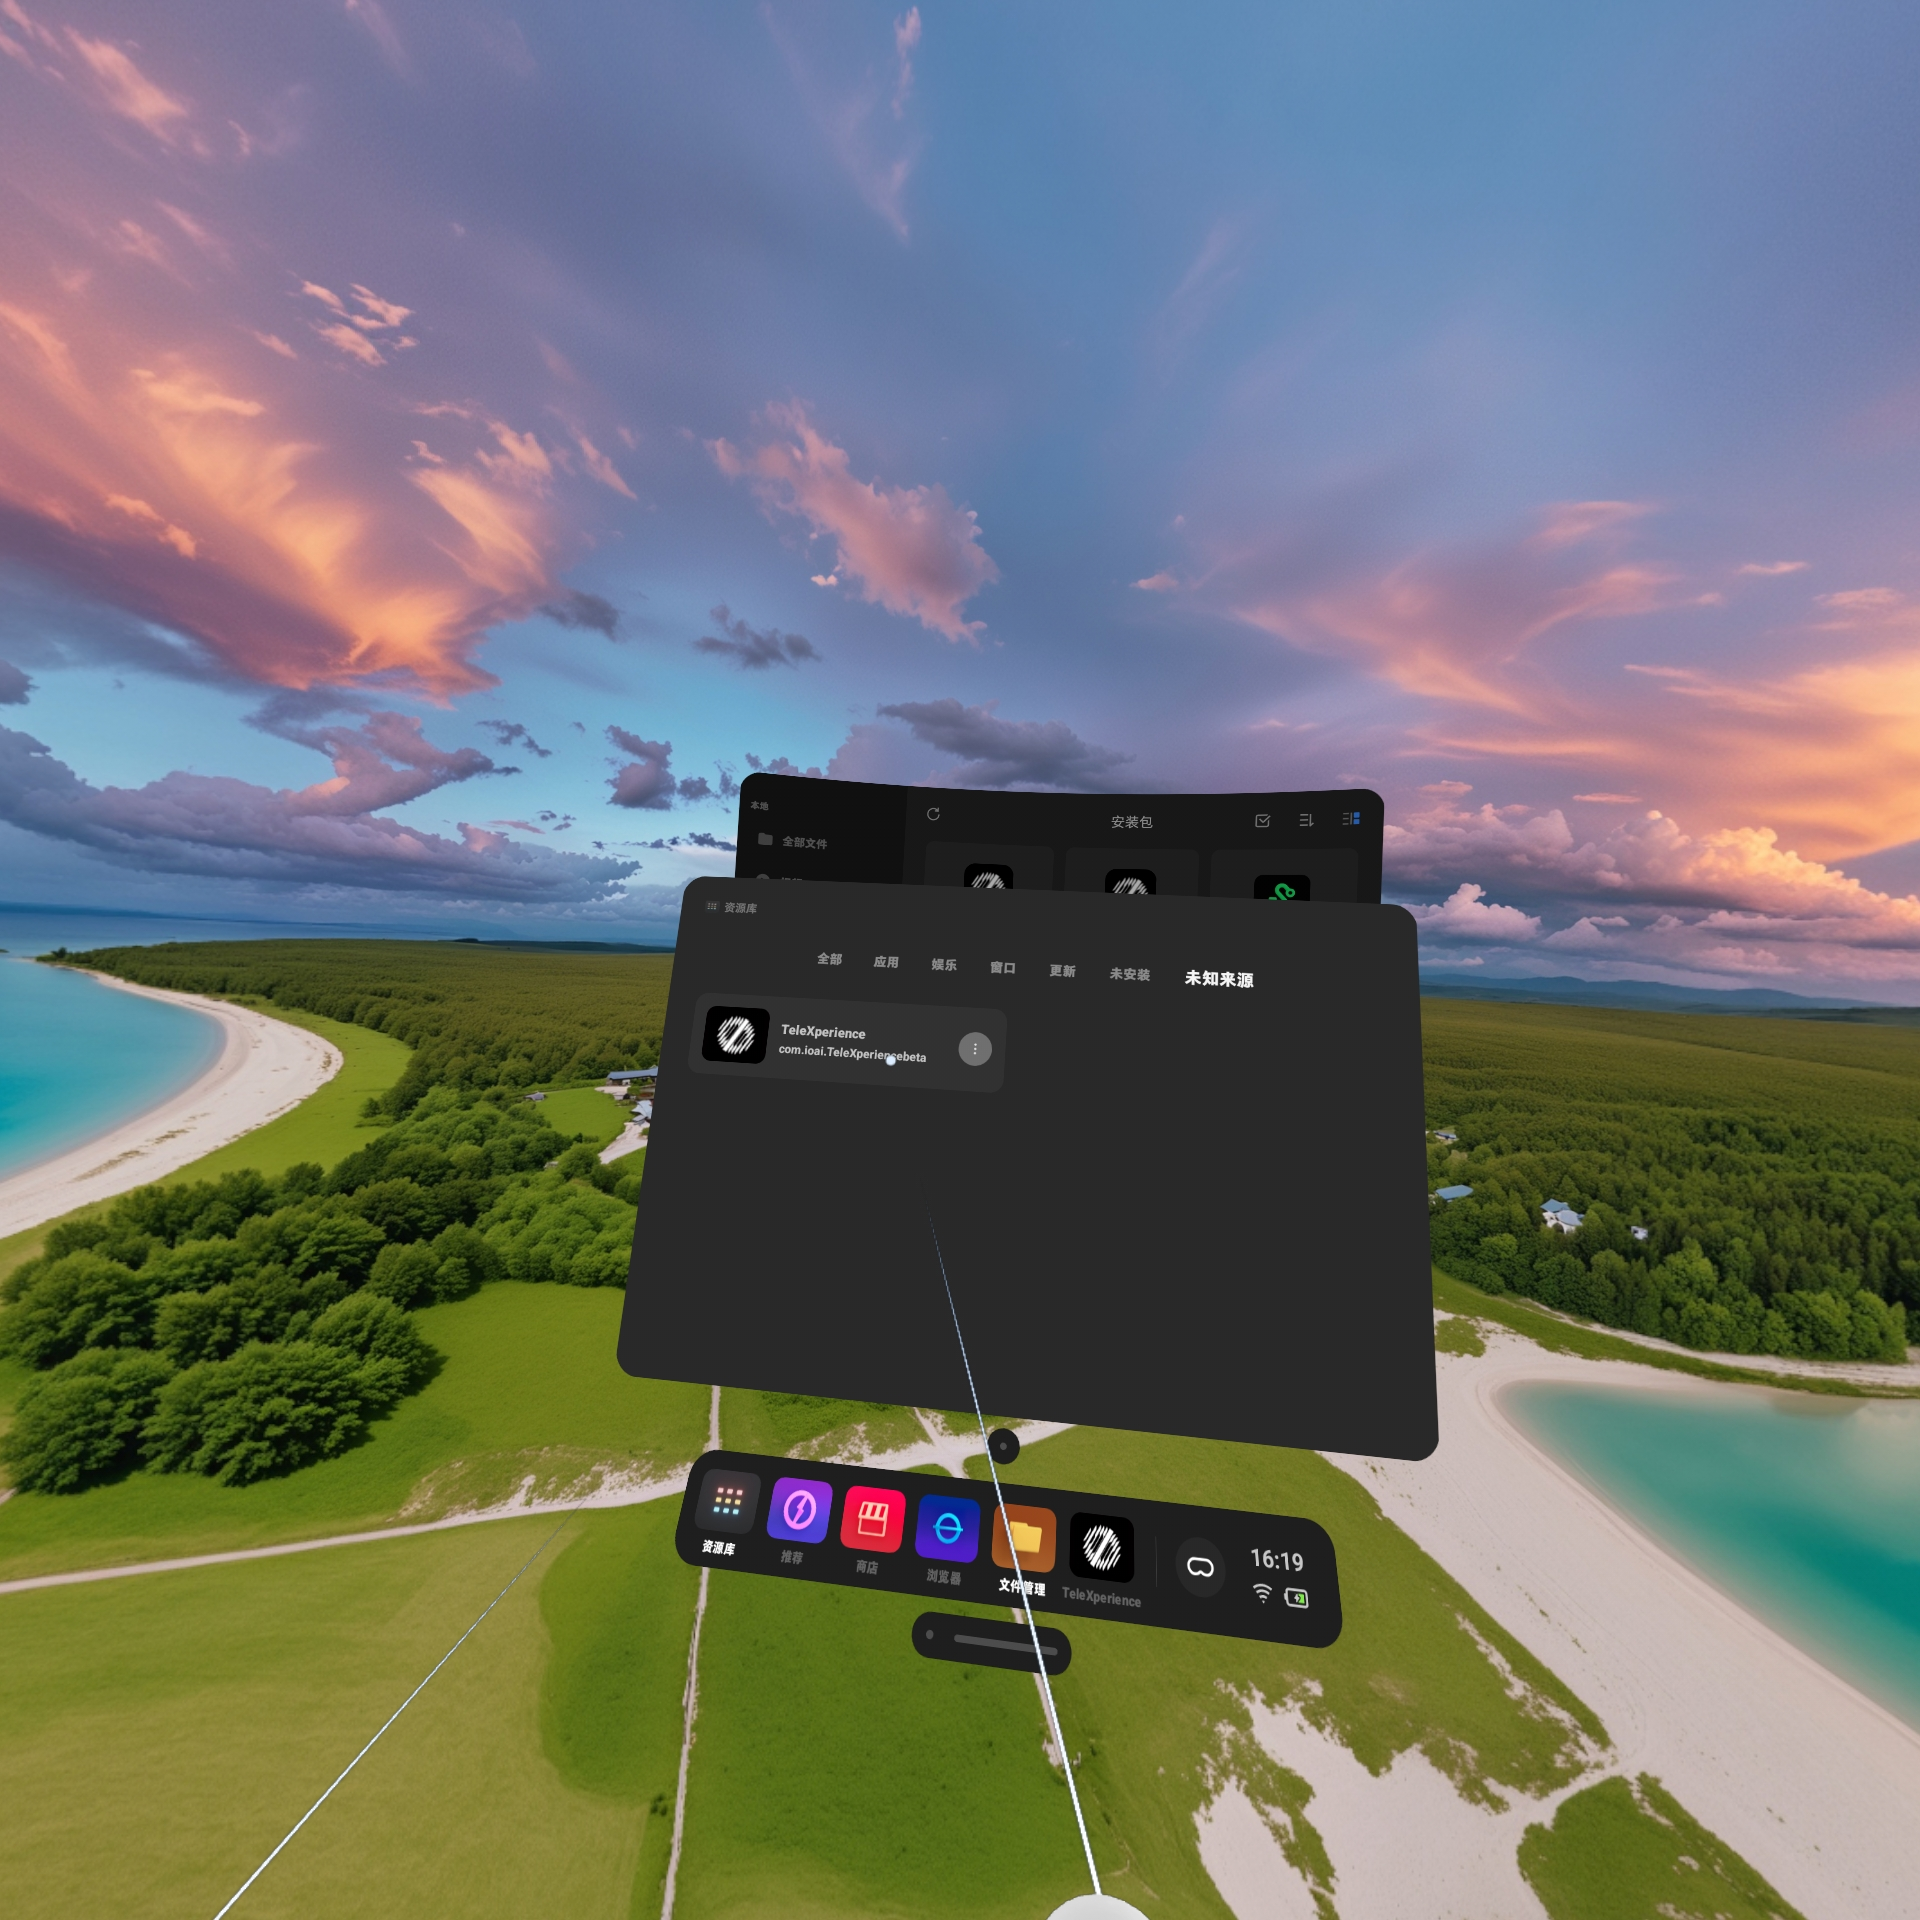
- Select the newly installed app and click Open to launch it.
Embedded Firmware Upgrade
This section explains how to upgrade teleoperation device embedded firmware from V2 to V3, or downgrade from V3 back to V2, through a browser. The entire process is completed on the web frontend, with progress shown in the installation log. If you encounter issues, save the log and contact technical support.
What Are Upgrade and Downgrade?
| What you want to do | Package to use (filename example) | Description |
|---|---|---|
| Upgrade | embedded_upgrade_0.7.0.zip (version number may vary) | Upgrade the entire device from old firmware (V2) to new firmware (V3) |
| Downgrade | embedded_downgrade_0.7.0.zip (version number may vary) | Roll back from new firmware (V3) to old firmware (V2) |
Precautions
- Confirm the motion capture HUB is connected before updating: check that the motion capture HUB is connected to the main control in the suit. Updates cannot proceed without the HUB.
- Confirm all devices to be updated are connected and powered on before updating: including the motion capture suit, left/right IMU gloves, left/right exoskeleton gloves, etc.
- Wireless exoskeleton gloves: use wired connection for updating.
- Please wait patiently during the update process — interrupting may cause failure. The update rewrites internal device programs and may restart devices. Do not close the web page, disconnect power, or disconnect device cables during the update.
How to Operate on the Web Page?
- Connect your computer to the TeleSuit Wi-Fi.
- Open
http://10.42.0.2:5000in a browser and go to the Software Installation & Update page. - Network Connected in the top-right corner only indicates the status between the browser and the local management page service — it is not a prerequisite for updating. You can proceed even if it is not displayed or temporarily grayed out.
- Click Select File and choose the official upgrade or downgrade package (.zip).
- Click Upload and Install and wait for installation to complete. Do not close this page during installation.
- If installation fails: use Copy or Download next to the log to save the complete log.
Log Reference
- Numbers like
[0/8]in the log:
- Indicate major upgrade phase progress.
- Specific steps and behavior:
- Inventory, flashing, and write-back failures: the system will automatically retry.
- Priority order: exoskeleton devices on the same side are processed before gloves.
- Target version check: if a device already reached the target version, that step will be skipped.
- Parameter read source:
- After the first inventory, the system checks for parameter backups on the main control:
- During upgrade: attempts to load
old_hub_params.bin. - During downgrade: attempts to load
new_hub_params.bin.
- During upgrade: attempts to load
- Resume logic:
- If a valid backup exists on the main control, load directly from file (resume install; log may show messages like "legacy intrinsic params" or "skip re-read").
- If no backup exists, re-read parameters from devices through the HUB.
- Deletion and skip:
- After successful parameter read, the system usually automatically deletes the used backup file.
- In certain special cases (e.g., HUB version issues or HUB-only scenarios), the entire parameter read process may be skipped.
| Log text | Meaning |
|---|---|
UPGRADE / DOWNGRADE | Upgrade / downgrade process |
[0/8]…[8/8] | Major phases (flashing may not be numbered individually) |
| Consistency check passed/failed | Whether online devices match parameters |
HUB-only | HUB update only |
| Legacy intrinsic params / skip re-read | Resume install from backup file |
| Retry | Automatic retry |
| Verification passed/failed | Single step result |
Troubleshooting
Symptom: Installation failed with error messages in the log.
Solution:
- Open a new browser page and retry installation — most issues (such as communication interruption or probabilistic hardware faults) can be resolved by retrying.
- Collect log information: if the problem persists, save logs from both the first attempt and the retry.
- Check HUB status: confirm the HUB indicator light status, noting any abnormal conditions such as red-green alternating blinking.
- Contact technical support: provide logs from both attempts along with HUB indicator status for further assistance.
Exoskeleton Wireless Module Firmware Upgrade
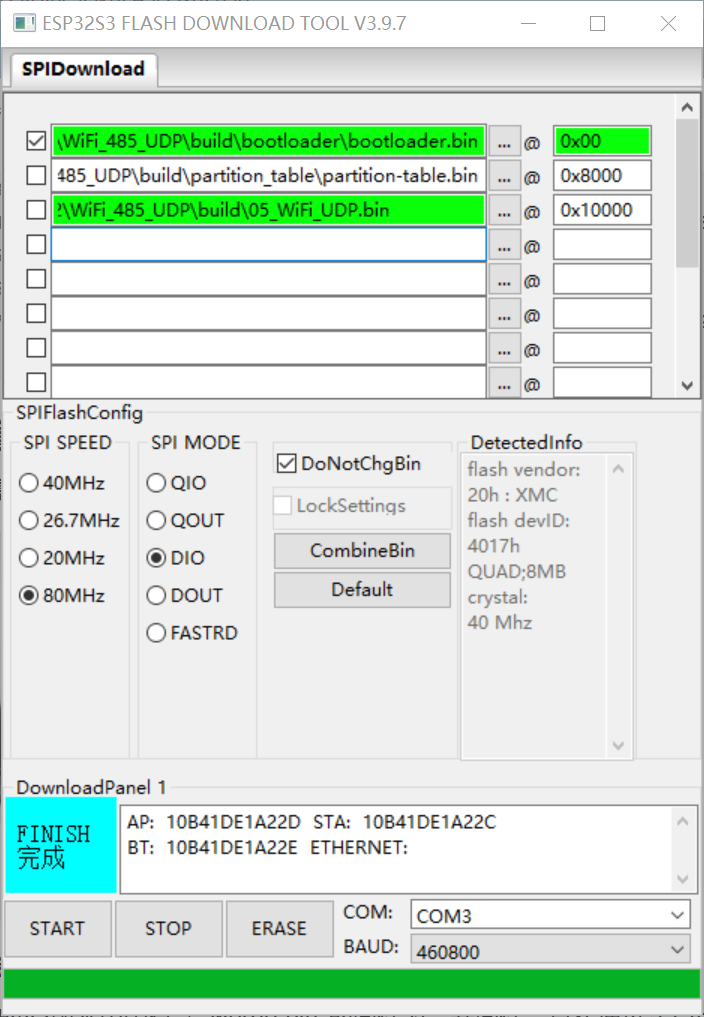
- Upgrade script:
esp32s3_flasher.py - Non-refactored firmware:
WiFi_485_UDP_OTA_20251112_V08.bin - Refactored firmware:
RE_WiFi_485_UDP_OTA_20260428_V30.bin - Merged single firmware:
RE_WiFi_485_UDP_OTA_20260521_V31_Merge.bin
Usage:
python esp32s3_flasher.py <port> <firmware.bin>
Upgrade example:
python esp32s3_flasher.py COM3 RE_WiFi_485_UDP_OTA_20260428_V30.bin
Downgrade example:
python esp32s3_flasher.py COM3 WiFi_485_UDP_OTA_20251112_V08.bin
Precautions:
- Connect via USB to a computer for standalone upgrading.
- Firmware flashing notes:
In the refactored V3 version, firmware files with
*_Merge.binare merged firmware — flash directly to address0x0000usingflash_download_tool_3.9.7. For non-merged firmware, flash the three built firmware files to their respective addresses:
| Path | Flash Address | Function |
|---|---|---|
*\build\bootloader\bootloader.bin | 0x00 | Bootloader |
*\build\partition_table\partition-table.bin | 0x8000 | Partition table |
*\build\05_WiFi_UDP.bin | 0x10000 | Main program |
If you encounter other issues, please contact technical support.